ComfyUI 8GB VRAM Tutorial: Step-by-Step Beginner’s Text-to-Image Guide

Running next-generation AI image generators does not require an expensive enterprise workstation. At CodeAStar, we focus on helping beginners and enthusiasts experiment with the latest technologies using affordable and accessible configurations. Even if you do not own a high-end GPU with 24GB, 40GB, or more VRAM, you can still create impressive AI-generated images on an 8GB graphics card.
In this tutorial, we will use ComfyUI, a popular node-based AI image generation tool, together with optimized workflows and selected models that are suitable for everyday PCs.
By the end of this guide, you will learn how to:
- Generate your first Text-to-Image result using ComfyUI
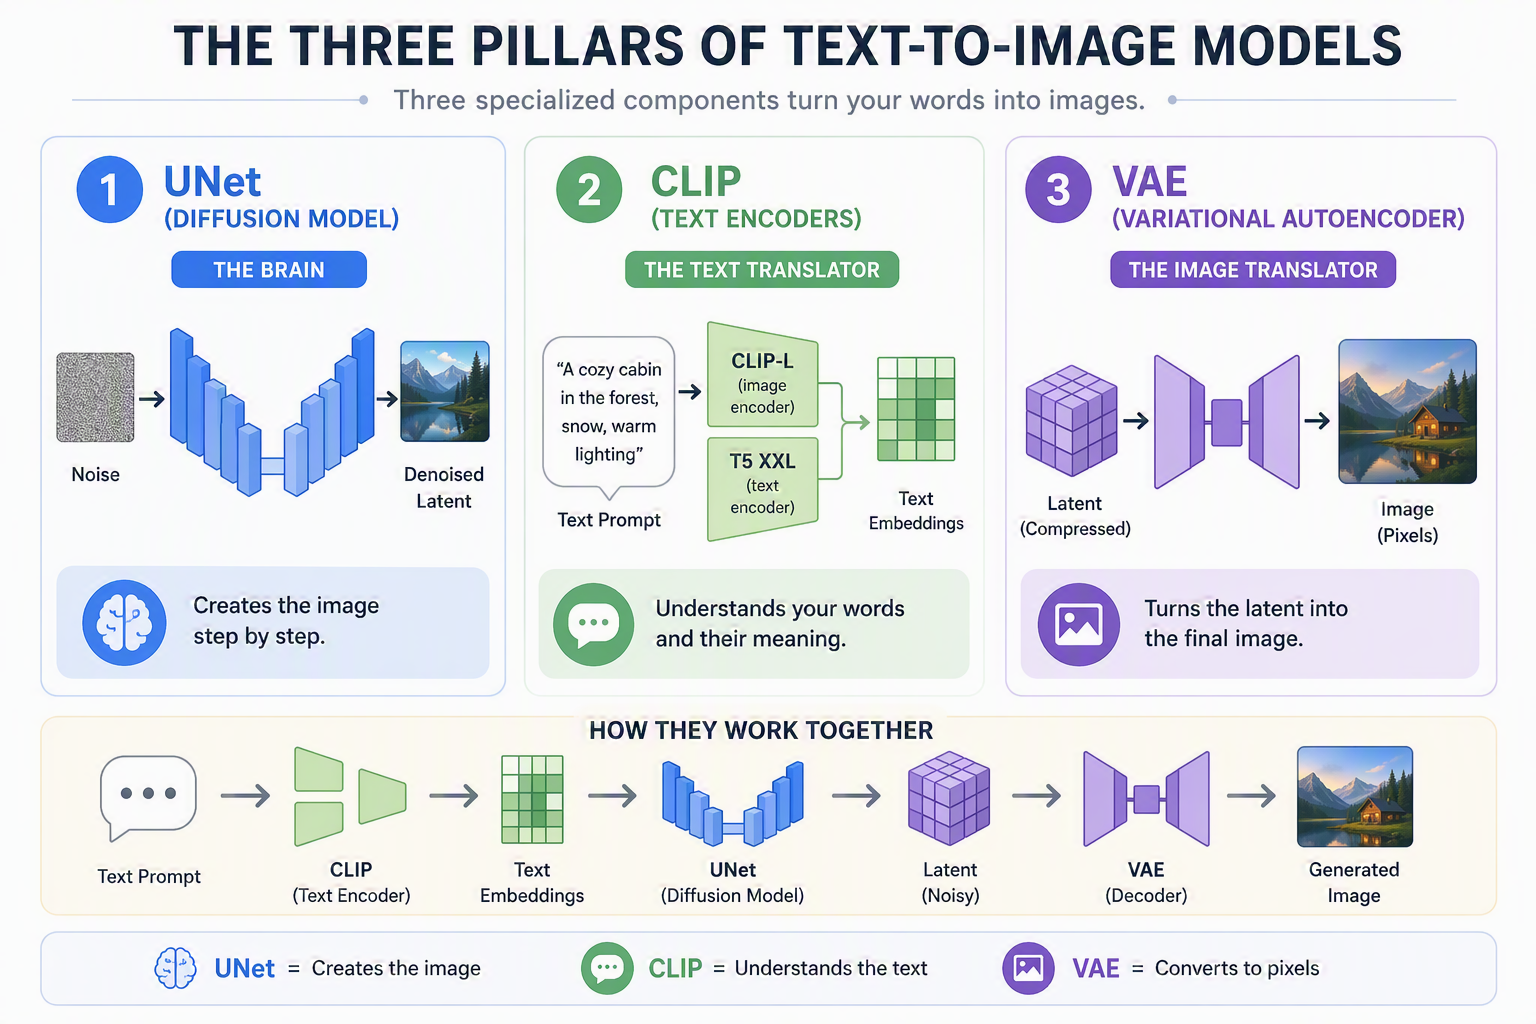
- Understand "The Three Pillars" of Text-to-Image model: UNet, CLIP, and VAE
- Run larger models such as FLUX.1-dev on an 8GB VRAM GPU effectively
- Build a simple quanztiated model workflow in ComfyUI
Why Choose ComfyUI?
Back when we first introduced FLUX, we used Forge as our go-to image generation UI. Forge is still an excellent choice, especially for resource-constrained enviroments. However, ComfyUI, a node-based interface for image generateion, brings the following major benefits to the table:
- Total Workflow Flexibility - Unlike Forge's structured layout, ComfyUI's infinite node canvas gives us total flexibility to chain, branch, and route models and conditioning exactly how we want
- Massive Community & Resource Hub – ComfyUI is backed by a massive global community, making it incredibly easy to find pre-built templates, custom workflows, and specialized nodes to accelerate our project without starting from scratch
- Efficient Memory Management – ComfyUI's lazy loading execution only runs the exact nodes active in our pipeline. Unlike Forge, which relies on aggressive background offloading to manage heavy workloads, ComfyUI handles massive models with minimal overhead, keeping generations fast and reducing out-of-memory errors
- Visual Troubleshooting and Self-Documenting Pipelines – We can see exactly how data flows from input to output, which components run in parallel, and precisely where an error is happening in ourpipeline execution
First steps with ComfyUI
To begin, head over to the official ComfyUI website, download the application, and launch it.
If this is your first time using a node-based interface, the blank canvas might feel intimidating. Don't worry! Let’s load up a starter template:
- Click the Template icon on the left menu bar.
- Inside the Templates dialogue, search for Image Generation under the Getting Started section.
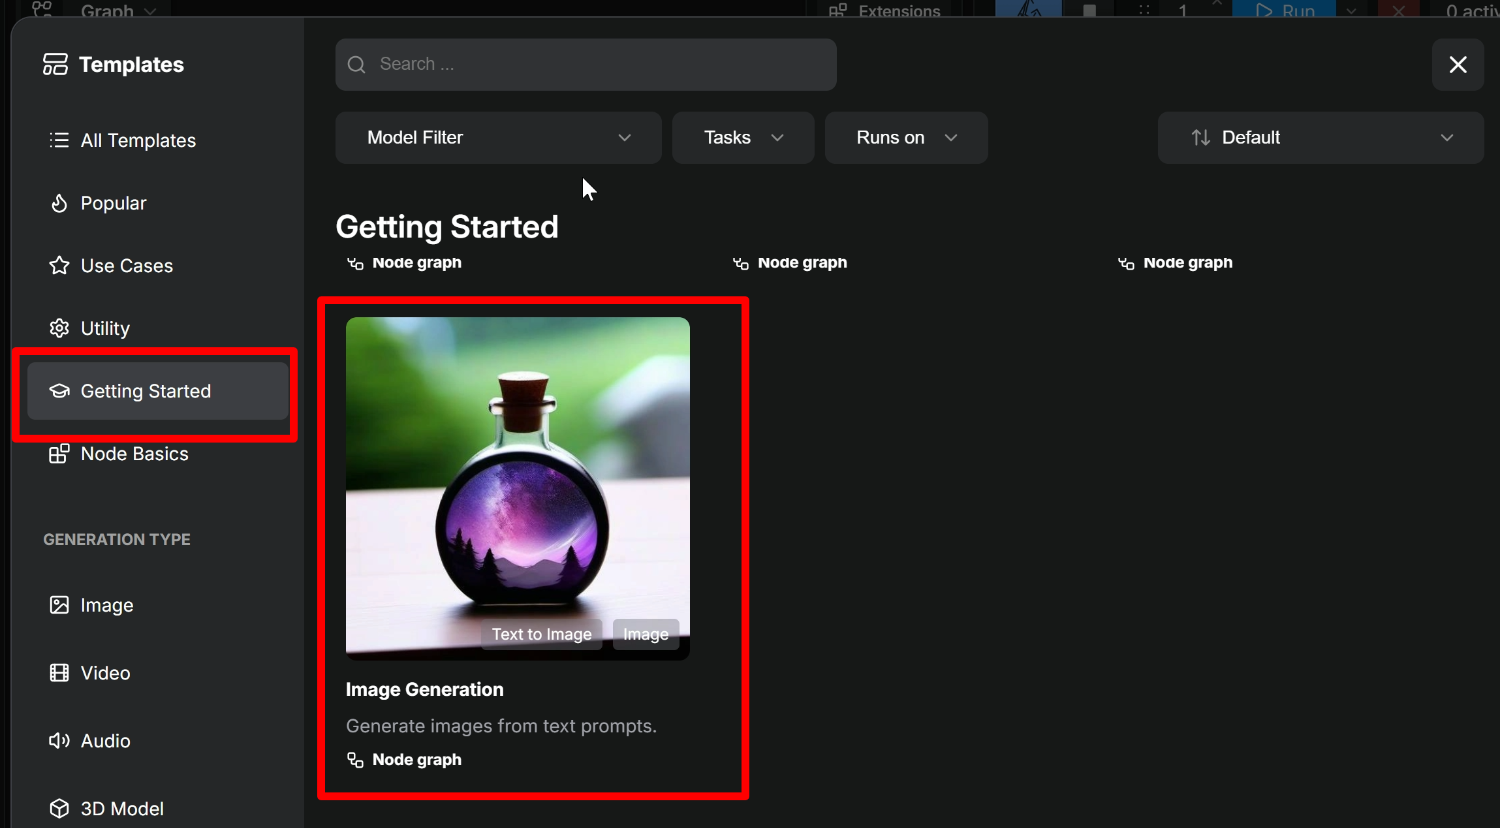
Clicking it will auto-populate your canvas with a foundational workflow:
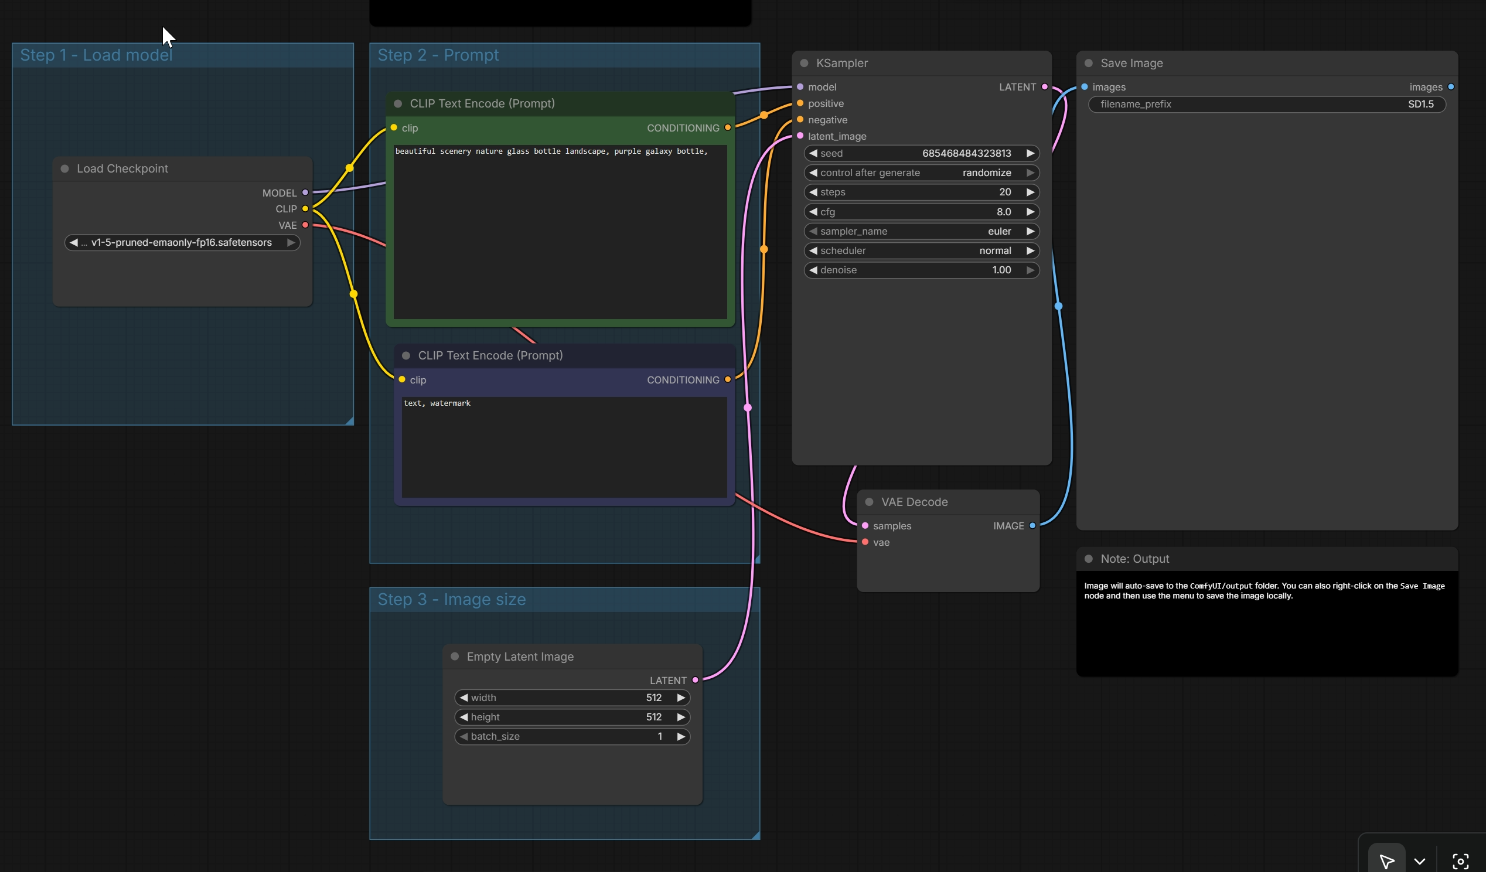
While it may look overwhelming with all the wires and boxes, it is actually incredibly straightforward. This is a standard Text-to-Image pipeline utilizing a lightweight Stable Diffusion 1.5 model, which is perfect for testing a low-VRAM configuration. If the model file doesn't exist on your local machine, ComfyUI will automatically locate and prompt you to download it.
After the model download, just run it. In a short time, it will generate an image that match your textual description. You can now a ComfyUI user! We will now test more on other models based on the workflow you have just tried.
Once the model is ready, just run it. Within moments, you'll see your first AI image generated matching the textual description. Congratulations, you are now a ComfyUI user!
Now, let's push our 8GB VRAM limits further by running a much larger, state-of-the-art model.
Running FLUX and large image models on ComfyUI
From our past experience, we used FLUX 1.dev with Forge to generate images with stunning details. However, FLUX 1.dev is a massive 12-billion parameter model, which may be a headache for a machine with only 8GB of VRAM. But, with quantized models, which we mentionedfrom our previous post, we can reduce memory requirements and make it possible to run larger models locally.
This is where GGUF (GPT-Generated Unified Format) comes in.
A useful way to understand GGUF is to compare it with a virtual machine image. A virtual machine image may contain:
VM Image
├── 🖥️ Operating system
├── ⚙️ Settings
└── 🏷️ Metadata
While a GGUF model file may contain:
GGUF
├── 🧠 Model weights
├── 🔤 Tokenizer
├── ⚙️ Context settings
├── 💬 Chat template
├── 🏷️ Metadata
└── 📦 Quantization info
Just as loading a VM image gives you a completely packaged OS with all its settings ready to go, loading a GGUF file hands the system the model weights alongside all the structural data required to run inference. Crucially, GGUF incorporates advanced quantization. By compressing the model's weights from 16-bit floating-point precision down to 8-bit, 4-bit or even lower integers, we can run high-quality, heavyweight models locally without exhausting our hardware resources.
Step-by-Step Guide: Running FLUX GGUF in ComfyUI
First things first, download the FLUX.1 dev GGUF model.
Hugging Face is the premier hub for these files. We can download one from https://huggingface.co/city96/FLUX.1-dev-gguf repository. The repository provides different quantization levels, for examples:
flux1-dev-Q8_0.gguf- An 8-bit quantization offering higher accuracy but a larger file sizeflux1-dev-Q2_K.gguf- A 2-bit quantization that is highly compressed and tiny, but sacrifices visual accuracy as a tradeoff
For a sweet spot on an 8GB VRAM card, we recommend downloading flux1-dev-Q4_K_S.gguf (4-bit quantization). Once downloaded, place the file in your ComfyUI directory under the unet folder:
📂 ComfyUI/
├── 📂 models/
│   └── 📂 unet/
│       └── flux1-dev-Q4_K_S.gguf
By default, ComfyUI does not include GGUF loaders for FLUX GGUF models. We need to install a custom node extension:
- Click the the ComfyUI icon on the left menu bar, then click Extensions
- Search for
ComfyUI-GGUF - Click Install, and restart ComfyUI
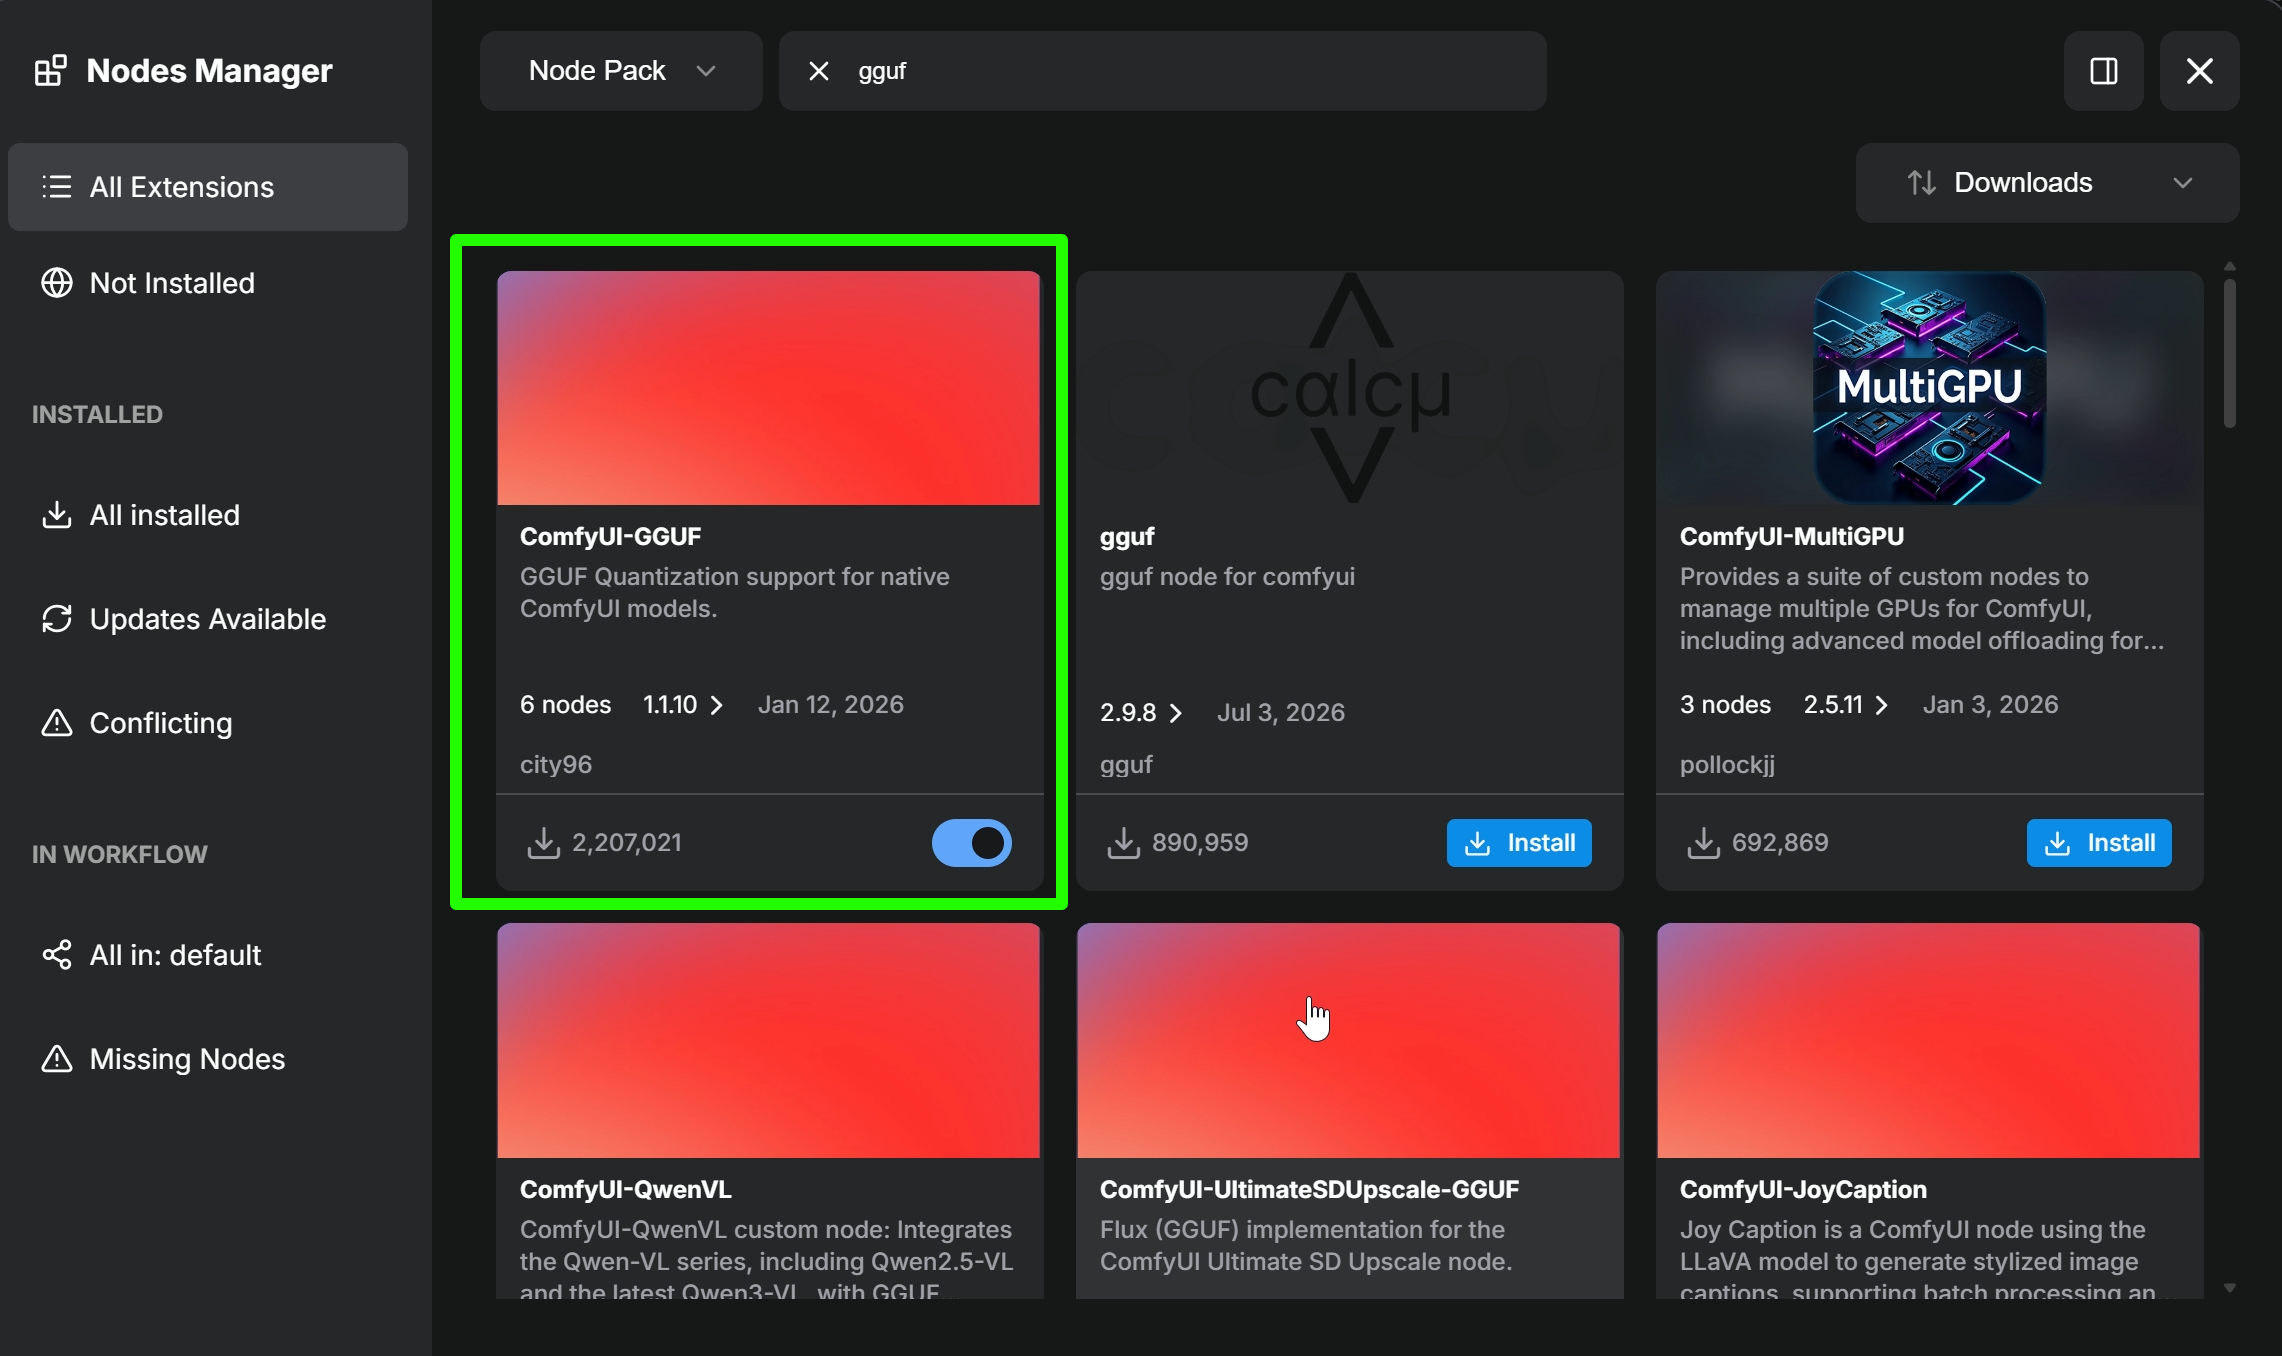
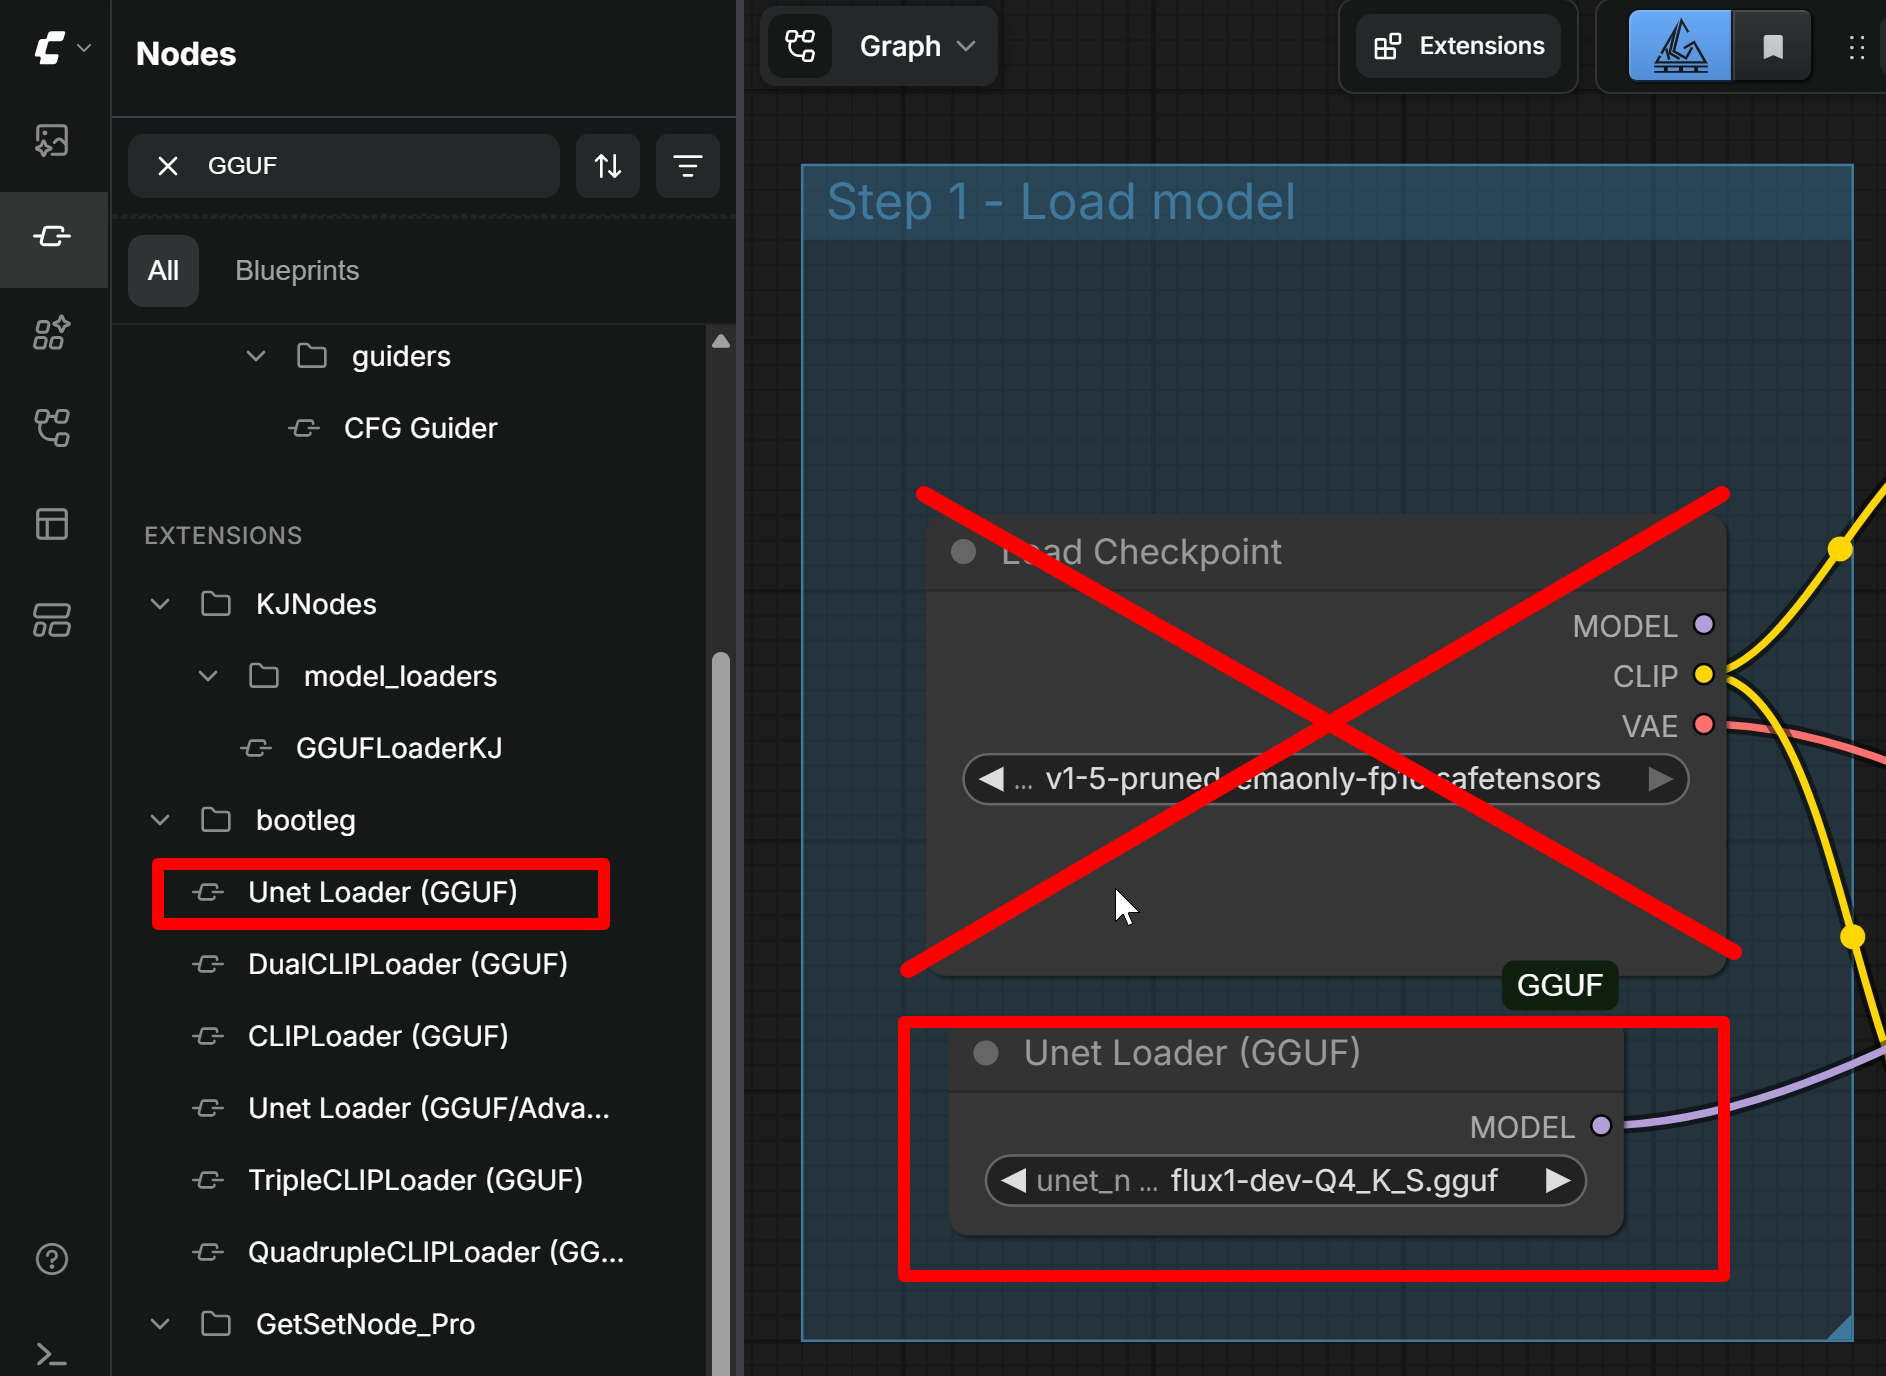
Now we will modify the earlier Image Generation workflow and turn it into a FLUX.1-dev GGUF workflow:
- Open the Node Library from the left menu and search for
GGUF - Select and place the Unet Loader (GGUF) node
- Delete the original Load Checkpoint node, replace it with the Unet Loader (GGUF), and select the downloaded
flux1-dev-Q4_K_S.gguffile
Understanding the Three Pillars of Text-to-Image Model: Unet, CLIP, and VAE
You might notice that the old Load Checkpoint node had built-in outputs for MODEL, CLIP, and VAE, whereas our new Unet Loader (GGUF) node only outputs a MODEL. Where do the CLIP and VAE connections go?
To understand why we need separate loaders, let's break down what these components actually do in an image generation pipeline:
- Unet (U-Network) - The core U-shaped neural network engine. The left side of the U is the encoder. It gradually reduces the image into smaller, more abstract features. The bottom is the bottleneck, where the model keeps a compact understanding of the image. The right side is the decoder, which expands the information back toward an image-like representation. Skip connections act like bridges across the U, passing fine details from the encoder directly to the decoder so the generated image can preserve structure, texture, and detail
- CLIP (Contrastive Language-Image Pre-training) - A vision-language model that bridges human language and machine imagery. It interprets your written prompt and maps its semantic meaning directly into the AI's generation workspace
- VAE (Variational Autoencoder) - The translator between human-viewable pixels and the AI's internal optimized workspace (known as latent space). It compresses an image so the AI can process it efficiently using less memory, and then unpacks the final result back into a sharp, full-resolution image.
TL;DR: Unet is the brain, CLIP is the text translator, and VAE is the image formatter.
As modern AI models have evolved, these sub-components have grown too large to be packed into a single file. For example, FLUX requires two distinct CLIP models to process prompts: the standard clip_l for foundational image-text pairing, and Google's massive T5 XXL text encoder to help FLUX understand long, complex, and highly detailed descriptive prompts.
Because we are targeting an 8GB VRAM footprint, we prefer using GGUF quantized versions of these text and image encoders. Download the required files from Hugging Face and place them into their respective folders:
📂 ComfyUI/
├── 📂 models/
│   └── 📂 clip/
│       └── clip_l.safetensors
│       └── t5-v1_1-xxl-encoder-Q5_K_M.gguf
│   └── 📂 vae
│       └── ae.safetensors
Now, let's hook them up on our ComfyUI workflow:
- Add the CLIP - Add a DualCLIPLoader (GGUF) node and wire its
CLIPoutput into the Positive and Negative prompt nodes. Selectclip_l.safetensorsas your visibility model,t5-v1_1-xxl-encoder-Q5_K_M.ggufas your text model, and set the type architecture toflux. - Add the VAE - Add a standard Load VAE node, select the downloaded
ae.safetensorsfile, and wire its output directly into the VAE Decode node of the workflow.
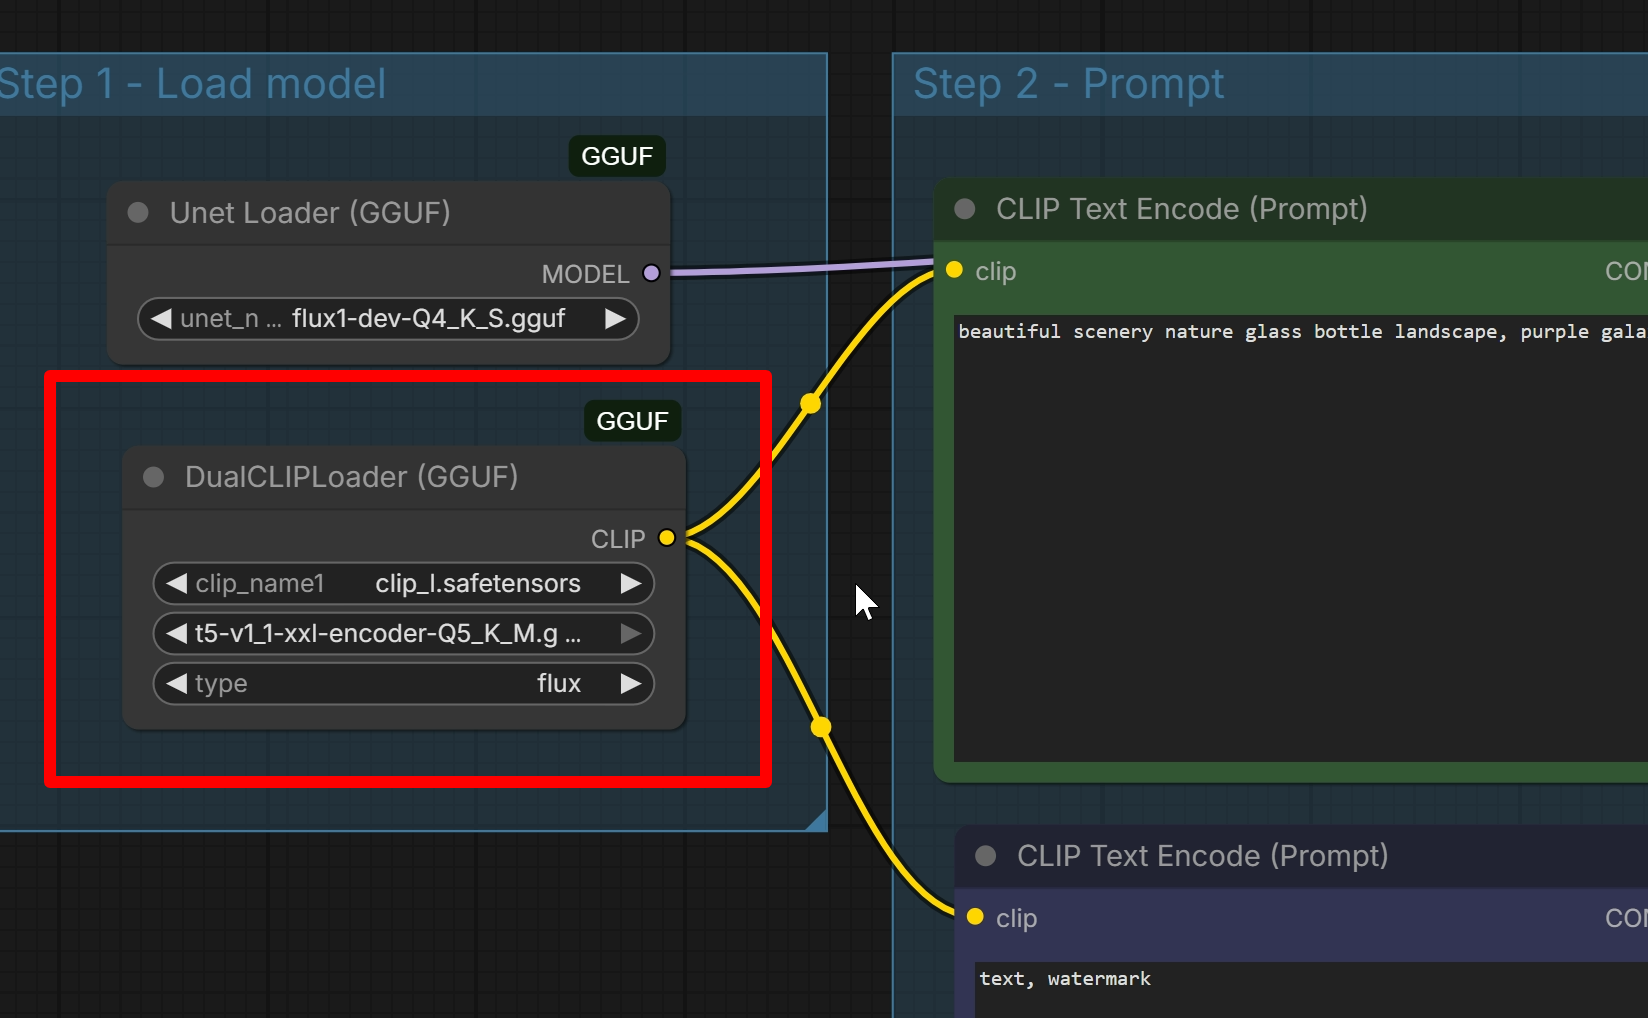
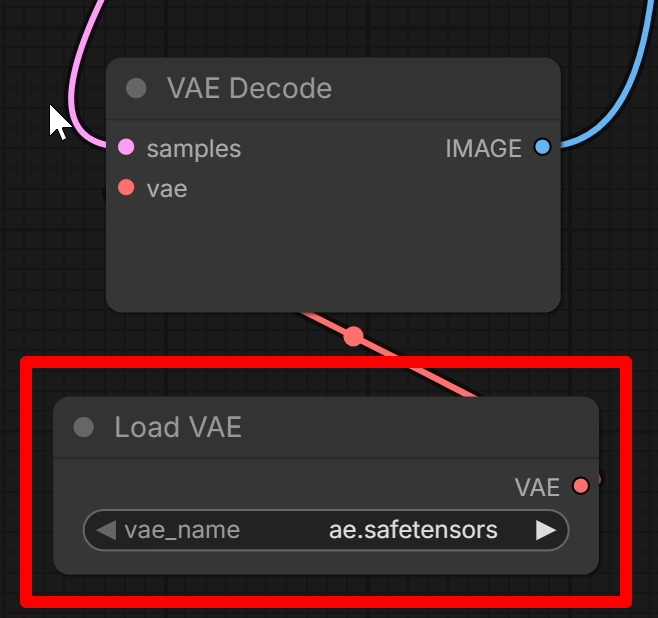
Add the CLIP and the VAE
Time to Generate!
We now have a fully functional, memory-optimized FLUX.1-dev GGUF workflow running safely with the 8GB VRAM setup.
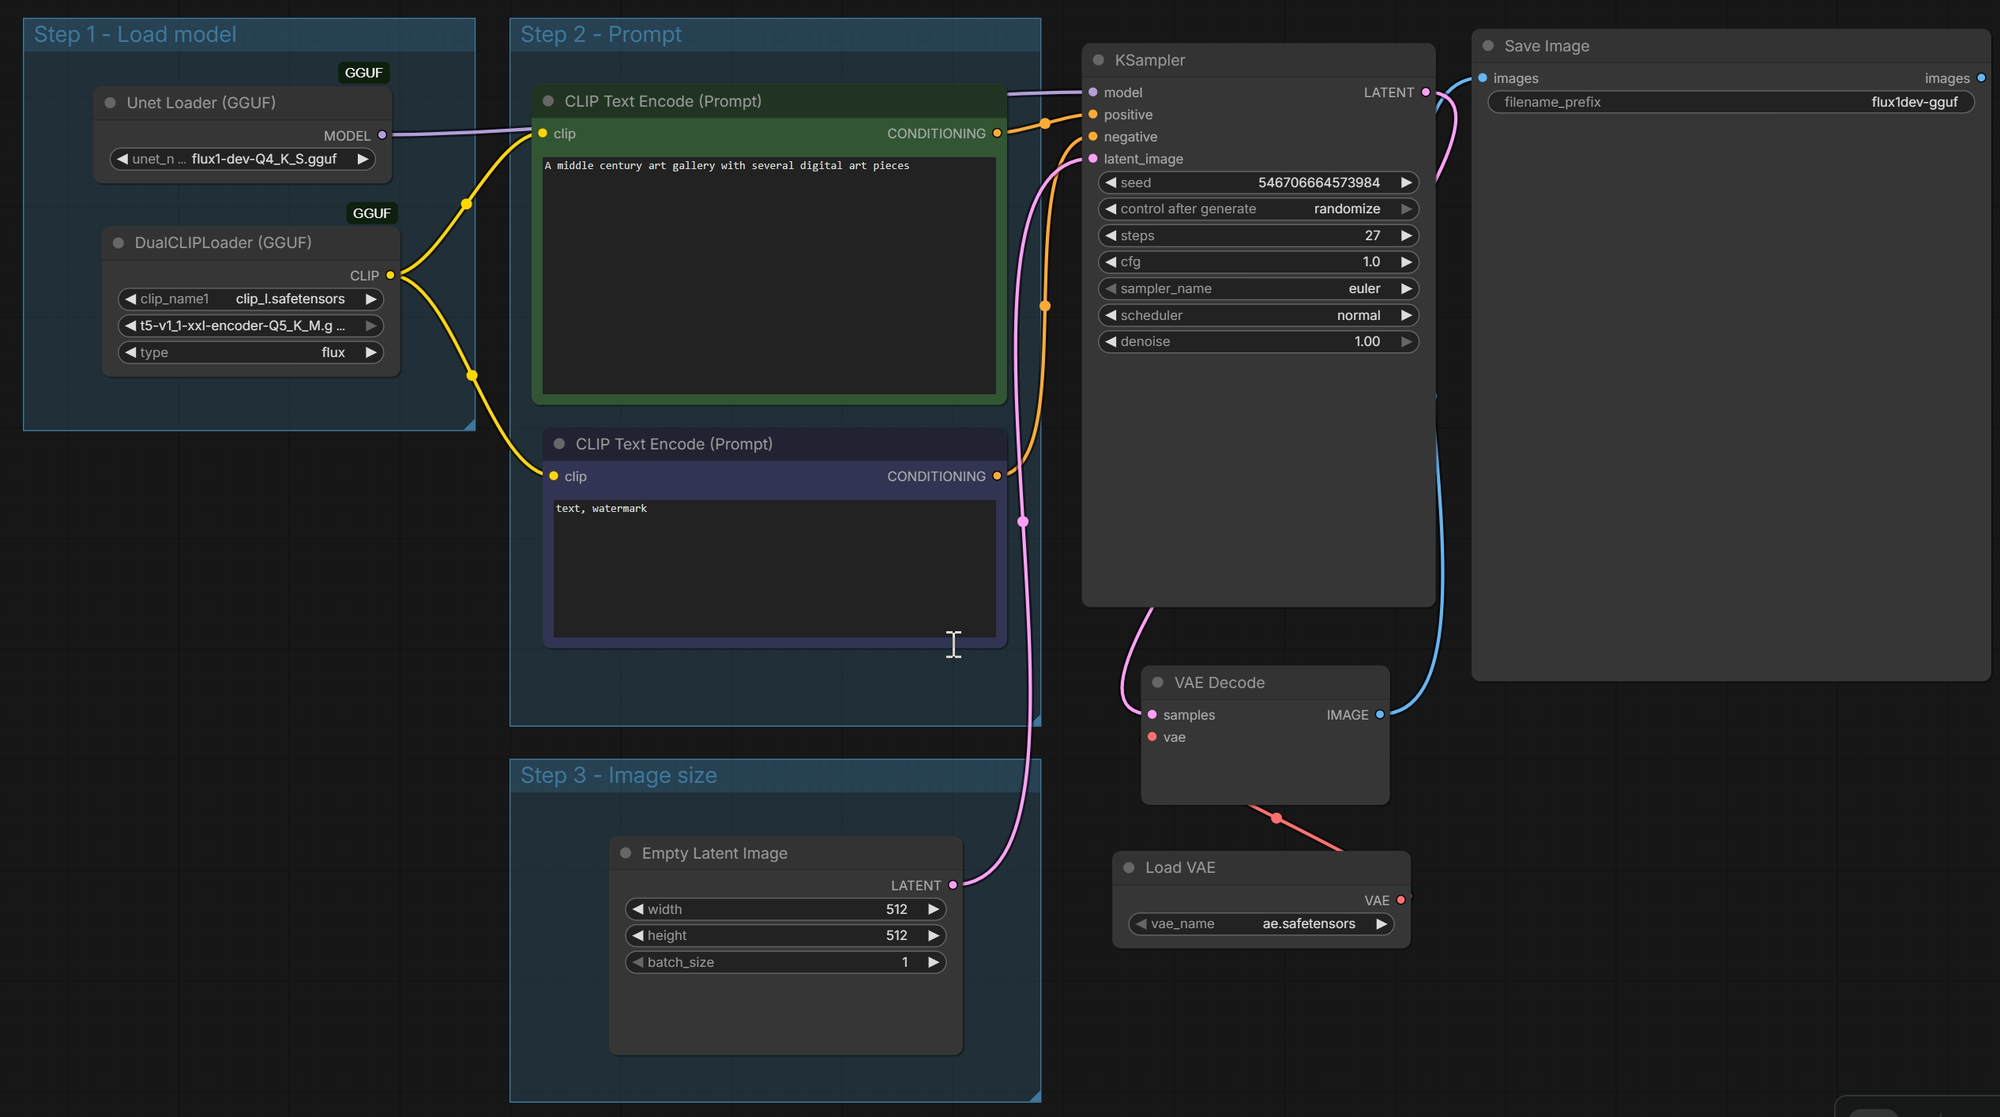
To test it, input a highly descriptive prompt into your positive text node to let the CLIP translate your words:
A mid-century modern art gallery with large windows, sunlight casting sharp shadows, showcasing several glowing digital art abstract pieces on the walls, clean architecture, hyper-detailed.
Run it, give your system a moment to cast its magic, and watch your 8GB graphics card output professional, state-of-the-art AI artwork.

The Final Render
ComfyUI may look complex at first, but once you understand the basics, it becomes a flexible and powerful tool for AI image generation. Thanks to GGUF quantization and optimized workflows, even users with an 8GB VRAM GPU can experiment with advanced models without requiring expensive hardware. With the right setup and a willingness to explore, high-quality AI image generation is now accessible to beginners and hobbyists on a typical home PC.