Learn how to use Stable Diffusion Part 2 - Sampling Methods


In our last post, Learn how to use Stable Diffusion - Part 1, we mentioned sampling methods and stated that this is a huge topic. Right now, let's continue our Stable Diffusion learning journey. Besides discussing the main course, Sampling Methods, we are going to have appetizers as well, like prompt and checkpoint. We hope you all can enjoy the meal this time. Let's dig in!
Appetizer I: Prompt
Most of the generative art starts with text inputs, the prompts, so let us start from here. We knew from our last post, prompts can be inputted as a full sentence or a list of keywords. For beginners, we would suggest using full sentences as inputs first. So you may see what you have inputted in a human-readable way. When you are more familiar with Stable Diffusion, you can use keywords as the prompts for a faster process. Speaking of keywords, here are the major types we use as inputs:
- Subject - the things we are going to generate (e.g. flying birds, Joe Biden, bedroom, a bear using a computer)
- Position - the poses of the subject(s) (e.g. full body, half body, look at viewers, standing, sitting)
- Style - the mood of the artwork (e.g. sketch, oil paint, cartoonish, Picasso's Cubism style, black and white, vintage)
- Resolution - how sharp and detailed the picture should be (e.g. 4K, 8K, Ultra HD, sharp focus), my personal note, more detailed output just looks more unreal
Other than learning the type of prompts, we should learn the weight of prompts as well. We can use () with a keyword and a value to strengthen or weaken the weight of the keyword. For example, (robot: 1.2) strengthens the "robot" keyword, and vice versa, (robot: 0.9) weakens the "robot" keyword. We can also use just () on a keyword to emphasize the weight.
When we group all the things together, we get the following prompts:

Here comes our result:

Since we have given 1.3 weight to the "taco" keyword. So we can see 2 giant tacos in our output :]] .
Appetizer II: Checkpoint
We learn from our machine learning exercises, what we got is what we trained. So the model's drawing styles and capabilities are all depended on what it has been trained. On Stable Diffusion, according to its GitHub page, the model is trained with a dataset of 5 billion image-text pairs from the open source project LAION. The large image dataset makes Stable Diffusion literally know many things / styles to draw. But it also brings out the general issue of "the bard problem" -- Jack of all trades, master of none.
So people start using Stable Diffusion model as a base model, to train their own checkpoints, with their preferred image datasets. At the end, the images from the additional datasets would favor the output generation algorithm, in other to produce the preferred content and styles. There are plenty of pre-trained checkpoints with various styles and content from CivitAI. We can find the differences between those checkpoint models and the Stable Diffusion default model from the images below.
Our prompts: woman, outdoor, half body, side view, busy street, (winter), 4kOur outputs and the checkpoint models (with downloadable links):
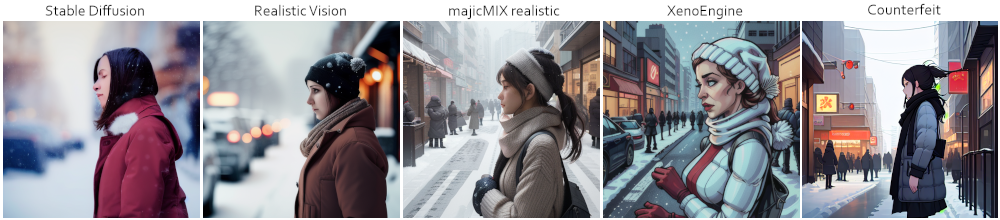
- Stable Diffusion - the original model, it does what we have inputted
- Realistic Vision - facial and background objects are generated with more details, i.e. more realistic :]]
- majicMix realistic - another realistic model, but it is trained with Asian-themed material
- XenoEngine - a model trained with the comic style
- Countererfeit - just likes the above model but with the anime style this time
We have the model downable links, then how do we apply it to Stable Diffusion WebUI? Just simply copy them to
<stable diffusion webui path>\models\Stable-diffusion\Reload your WebUI, then you can select the installed model to generate your graphics.
Main Course 1: Sampling Methods in Stable Diffusion
We find a list of sampling methods (samplers) available in the WebUI. Then it is always a question, which sampler should we use? Before we find out the answer, let us quickly go through those major samplers here.
- Euler - it came from the Euler method (around the 16th centuries), which is used to approximate solutions to differential equations
- LMS - Linear Multistep Method, a multi-step version of the single step's Euler for better accuracy
- Heun - an improved Euler method from Karl Heun
- DPM - Diffusion Probabilistic Model, it learns how the noised image is constructed then goes to denoise it
- DDIM - Denoising Diffusion Implicit Model, an improved and faster denoising model from DPM
- PLMS - Pseudo-Linear Multi-Step model, actually it is a sub-process of Pseudo Numerical Methods for Diffusion Models, another improved DPM
- UniPC - Unified Predictor-Corrector Framework, a new and fast model released in 2023
- <sampler> a - a sampler with "a" means this is an ancestral sampler. While other samplers converge when they settle the error range, an ancestral would keep adding noise to sampling steps
For a better comparison, we generate AI graphics using the following conditions with different samplers.
- Model - Stable Diffusion v1.5
- Prompt - A middle century art gallery with several digital art pieces
- Steps - 27
- Image Size - 512 x 512
- CFG Scale - 7
- Seed - 1573819953
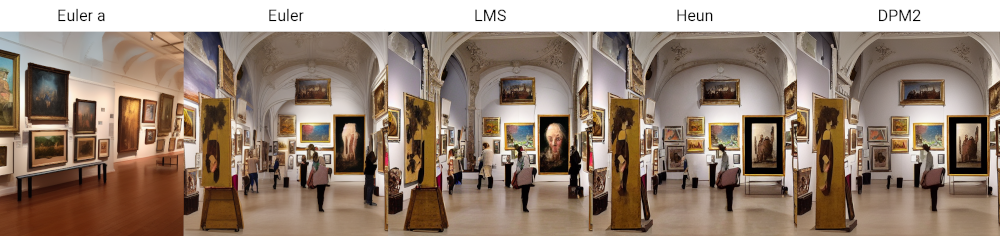
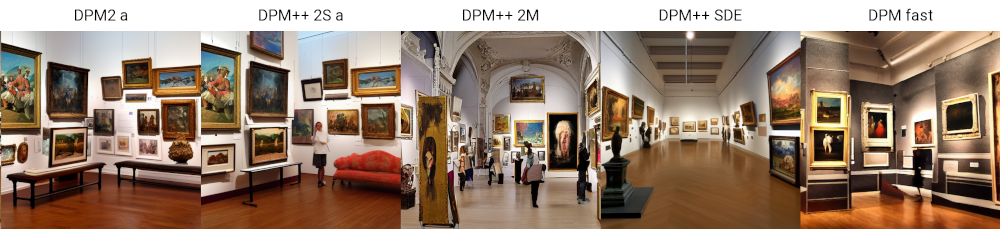
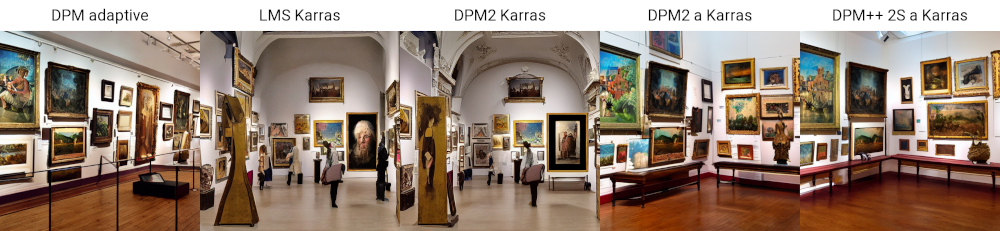
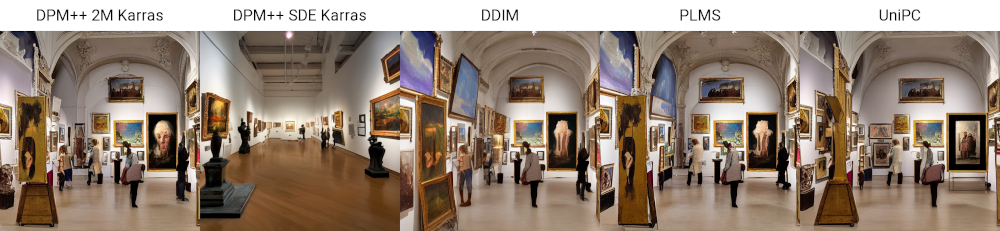
All samplers can generate decent outputs in general, but I would prefer a mid-century art gallery built with arches. And it looks like the steps are not enough to generate art pieces and visitors. If I have to select the best 3 from the above samplers, I should pick Heun, DPM2 Karras and PLMS.
Main Course 2: Sampling Methods in Stable Diffusion (cont.)
Now, let us test another topic, here is our input:
A portrait of a woman set against a dark background. The subject is positioned in a three-quarter view, facing slightly toward the viewer. The woman is portrayed from the chest up, with her upper body and face prominently displayed. She has a serene expression, characterized by a slight smile that seems to hold a sense of mystery. Her eyes are captivating, with a gaze that follows the viewer from various angles. The woman is portrayed with remarkable realism, with delicate brushwork capturing subtle details in her face and skin tone. Her brown hair is gently layered and frames her face. She is adorned in clothing typical of the era, wearing a dark-colored garment with a veil covering her hair. The painting's composition is relatively simple, focusing primarily on the subject and her engaging presence.
The origin of the above input is the textual description of the Mona Lisa. Let' see what can Stable Diffusion give us:
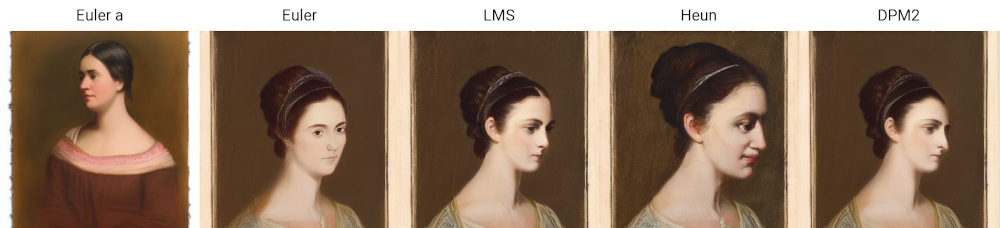
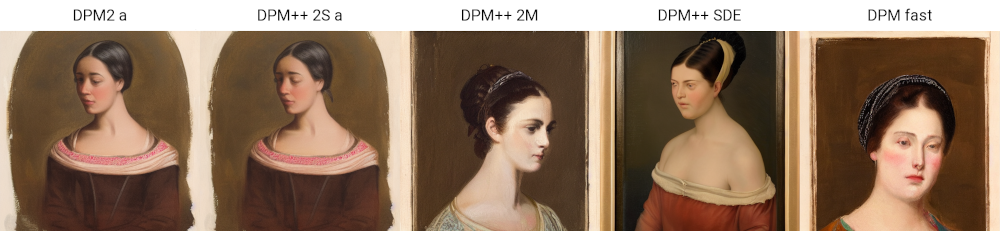
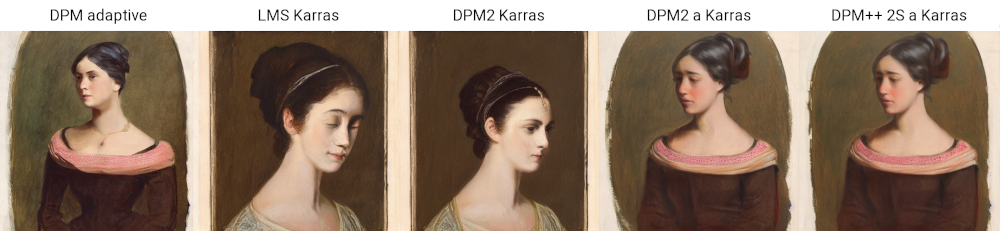
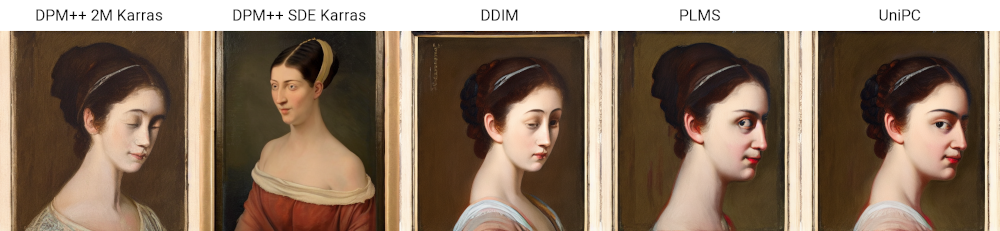
When it comes to generating a human subject other than a scene from AI, we will become more picky. Guess we are more familiar with our facial features and we can spot the differences more easily. And I think I see Mr. Bean from the above outputs... This time, my best 3 picks are DPM++ 2M, DPM2 Karras and DPM2 a Karras.
From the 2 inputs, we can see certain samplers are aligned with a similar style. Such as Euler, LMS, DPM++ 2M, DPM2 Karras and others are in one group. DPM2 a, DPM++2S a and DPM2 a Karras are in another group. And DPM fast is on its group. Even if samplers are in the same group, they may have a wide range of variance, just look at LMS and PLMS.
Dessert: Summary of Our Findings
Let us summarize what we have learned so far:
- types of prompts
- usage of models
- differences on samplers
We may use more specific keywords for constructing prompts. And the selection of a model, it is depending on the purpose of your generative AI graphics. Rule of Thumb, go to a model download site, pick your genre then pick the highest-rated model there. Then on the sampler side, separate samplers into different groups according to their styles and generate a testing image from each group. Once you find your favorite style, try to fine tune with each sampler within the group, to get your desired result.
We can take a look at the following chart to find a faster sampler in different groups.
Our Mona Liza prompt is longer and more complex than our art gallery prompt. But in some sampling methods, the Mona Liza prompt just uses a shorter time to generate. The longer prompt does not mean it needs a longer time to generate, but the number of objects to draw does. Our Mona Liza prompt focuses on describing a portrait. While on our art gallery prompt, it needs to generate the venue, art pieces and visitors.
We hope you all can utilize the use of prompts, models and samplers to make great generative graphics. Let's keep on drawing!