Easy Guide for Beginner: Learn how to use Stable Diffusion WebUI - Part 1

We have been learning programming and AI since the beginning of this website. Now, we are excited to explore the world of generative AI art using the Stable Diffusion WebUI. This innovative web interface provides us with a simple and efficient way to generate AI art. In one of our previous posts, we experimented with creating computer graphics, but it was all about programming from a programmer's perspective. We obtained results based on the code we wrote. However, with generative AI tool, we can provide prompts to our machine and let it creates the art on its own. This opens up a wider range of creativity, ideas, and styles that combine to produce new computer-generated art. The Stable Diffusion WebUI is the perfect solution to help us unlock the full potential of our artistic ideas. So, what are we waiting for? Let's get started!
What is Stable Diffusion?
If you just want to know how to use the WebUI, you can skip this section and go straight to the next section.
Stable Diffusion is a deep learning model that uses user inputs to generate images. These inputs can be in the form of text descriptions or other images. Now, you might be wondering, what exactly is a diffusion model? Well, think of it as a way to spread a new idea among a group of people over time.
In the context of Stable Diffusion, the user's input acts as that "new idea." However, it's important to note that the generative image is not directly created based on the input itself. Instead, the model starts with a random, noise-filled image and then applies a series of filters to gradually enhance it. This process involves the model understanding the user's input, using Natural Language Processing (NLP) for textual descriptions or image recognition for user-uploaded images.
The model repeats this filtering and enhancement process multiple times, with each iteration adding more details to the image. Gradually, the image evolves into a fully-formed picture that matches the user's input.
So, in summary, Stable Diffusion is a powerful tool that uses deep learning techniques to generate images based on user inputs. It progressively refines a random starting image, applying filters and improving it iteratively until it becomes a complete representation of the user's desired input.
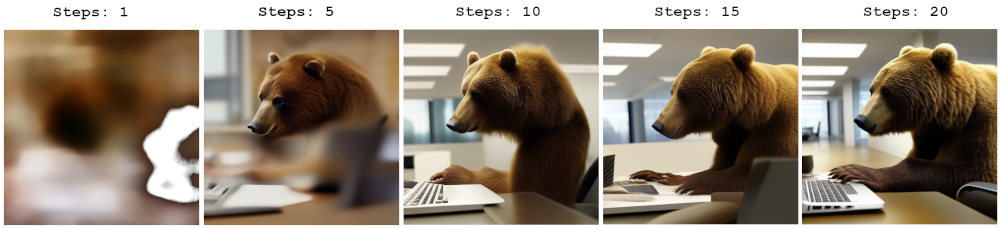
From our example here, I have entered "A brown bear uses a computer in an office" as my input and let the model generate the image in 20 steps.
Stable Diffusion WebUI Installation
It is a straight forward action, we just go to download the files from the author's GitHub page (thank you, AUTOMATIC1111) and install the web ui. Before doing that, we have to make sure the machine we are going to install, has at least 6GB VRAM in the GPU card. Just follow the installation instruction from AUTOMATIC1111's page and it should be no issues at all.
There are 2 installation tips we can provide.
- Use the exact version numbers for libraries and modules from the author's instructions for compatibility
- Install the optional xformers to speed up the image generation process
After the installation, run webui-user and copy the url (http://127.0.0.1:7860/ by default) from the console log. Place the url to a web browser, then the following interface should appear:
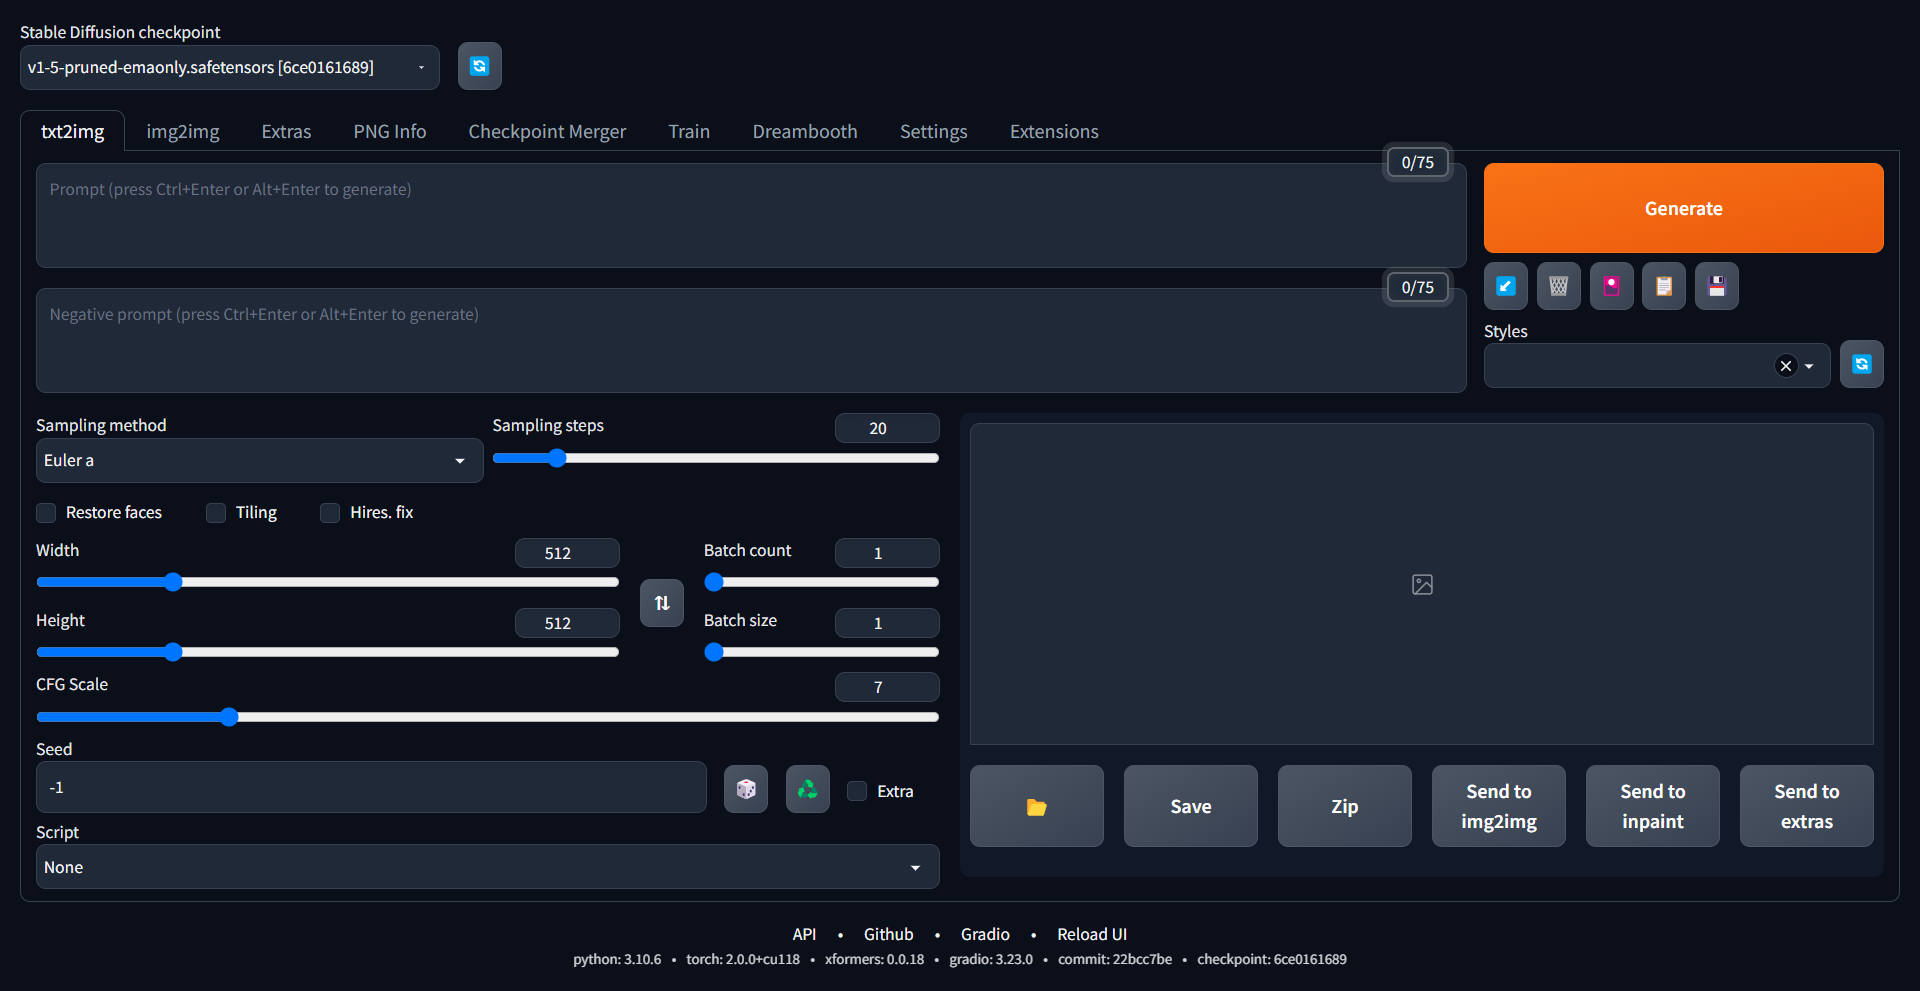
Stable Diffusion WebUI Major Components 1
The above screen is the main interface, txt2img, of Stable Diffusion WebUI and we are going to explain several import components there. It may be a bit long, so we split it into two parts.
- Stable Diffusion checkpoint - a model that takes our text inputs and generates related graphics, similar to the models we used in our previous machine learning exercises. The model's drawing capabilities depend on its training. We can even switch to a different model from the default (currently Stable Diffusion v1.5) to achieve desired results, such as more realism, cartoonish style, or Victorian style
- Prompt - the inputs we give to the model to generate graphics. It doesn't have to be a full sentence; a list of keywords works just as well (e.g. "brown bear, office, computer")
- Negative prompt - the opposite of a prompt. It tells the model what NOT to generate
- Sampling method - as mentioned earlier, generative art starts with a noisy image. The Stable Diffusion model then goes through a denoising process with several iterations to produce the final output. Each iteration involves creating a new sample, which is why it's called sampling. On Stable Diffusion WebUI, since there are many sampling methods available and this is a huge topic, we will discuss this matter in our next post
- Sampling steps - the number of iterations the denoising process runs
Stable Diffusion WebUI Major Components 2
- Restore faces - an option allows us to use face restoration algorithms (either GFPGAN or CodeFormer) to enhance the output of human faces
- Tiling - this feature makes the generative output seamless, like a texture or wallpaper
- Hires. fix - by default, the output image size from Stable Diffusion v1.5 is 512x512 pixels (or 768x768 in v2.0+). If we want higher resolution graphics, we can use the Hires. fix option to upscale the image. However, it's important to note that the model is trained on 512x512 / 768x768 data, so using other image sizes may distort the generated output
- Width - the name just says it all, the width of the output image. As we have just mentioned, output size other than the training image size may cause unexpected results
- Height - same as above
- Batch count - the number of times Stable Diffusion should generate images. The maximum count depends on the VRAM of your GPU
- Batch Size - the number of images generated in each turn. Again, it depends on the capacity of your hardware
- CFG Scale - Classifier Free Guidance Scale, the model's ability to classify the keywords we input. We'll provide an example in the next section to explain this feature further
- Seed - each generative image is based on an initial random image. If we want to reproduce a specific output, we can use the seed value to ensure consistent results
- Script - various graphics generative options, allowing us to generate graphics using different sampling methods or prompts in a single process. We'll demonstrate how to use it in the next section
Usage of Script in Stable Diffusion
We can use the "Script" option to produce graphics combined with different settings. In the following example, we use 'X/Y/Z plot' script to produce a set of images with different CFG Scale and Steps settings.
X/Y/Z plot can produce a matrix according to our criteria, so we add CFG Scale on the X-axis with "1, 7, 15" as the values. On the Y-axis, we use Steps and "20. 40" as the values. The prompt is "Joe Biden goes shopping in Milan". Then we have the following output:
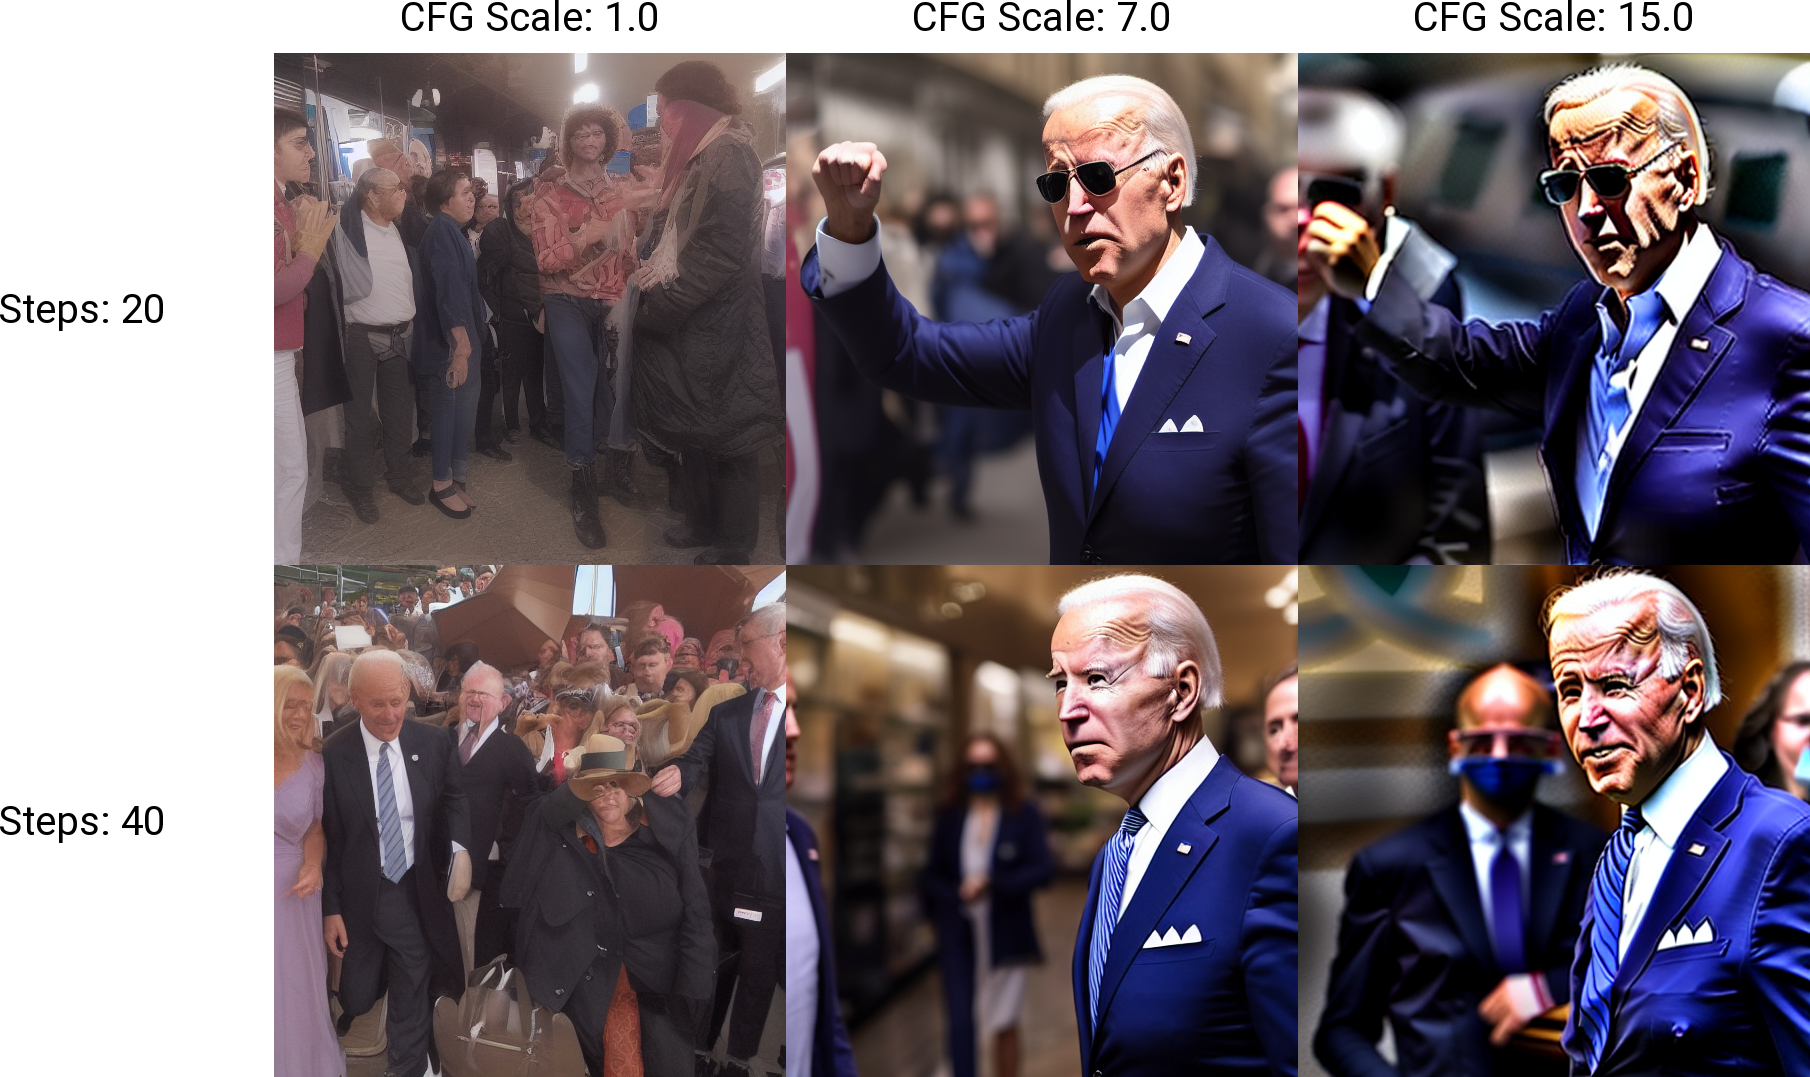
It is easy to notice the difference of the Steps values, with a greater number of steps, we should get a more detailed output.
While on the CFG Scale, it determines how strong the model classifies the keywords from the prompt. When the CFC Scale is set to 1, it treats keywords lightly, and literally denoises items related to the prompt. Therefore, when the CFG Scale is set to 7, the model recognizes specific keywords like "Joe Biden" and generates a recognizable image of Joe Biden. If we compare the images generated with CFG Scale 1 and CFG Scale 7, we can see that the images at CFG Scale 7 have fewer elements related to "shopping". In the case of CFG Scale 15 images, they are heavily biased towards the "Joe Biden" keyword, and there is hardly any shopping content present. So we would recommend using a lower CFG Scale if you want to generate more diverse and creative products.
Conclusion
There are still plenty of topics we would like to discuss about Stable Diffusion WebUI, such as the sampling methods on our next post. Since we encourage learning from trying, we recommend you follow the above steps and try it on your own first. Enjoy the fun of generative AI graphics!
What have we learned in this post?
- installation of Stable Diffusion WebUI
- major interface and its component in the WebUI
- usage of X/Y/Z plot script
- setting on CFC Scale