How to install Docker on Raspberry Pi


In this article, we will talk about Docker and Raspberry Pi. Docker is a platform you may probably hear it often recently. It is hot because it helps people simplify the DevOps process. It lets developers build light-weight applications. Then they can ship and run their applications "anywhere" (we will discuss it in later section). On the other hand, Raspberry Pi is a low cost, credit card sized complete computer. It is good for being used in education, development and IoT (Internet of Thing)! So what if we combine these 2 things together? We can use Docker to run different kind of applications on Raspberry Pi! Booyah! (ideally)
What is Docker?
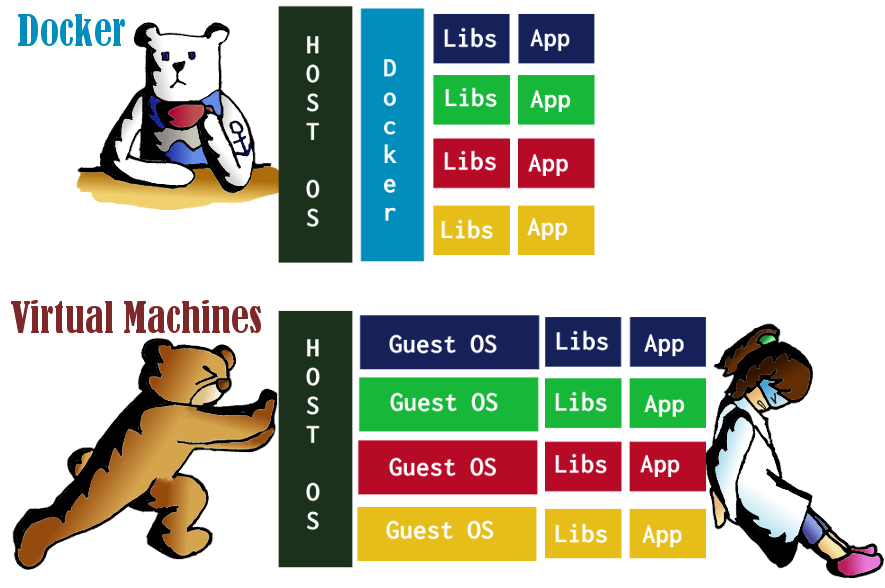
Let's get back to basics. What is Docker and why is it so popular? Docker is a platform which allows people running different kinds of applications on it. Oh yeah, you may think it is nothing new as virtual machines have already done this for long. Yes, but the beautiful part of Docker is, all of those applications are running under one single Docker engine. Unlike the case of virtual machines installing different guest OSes on a host machine, Docker only installs runtime libraries for related applications. Thus Docker can save more resources on host's machine and provide faster start up time.
Other than resource saving, Docker can bring standards to development team. Developers in the team use Docker to build an image, share with teammates and push it on testing environment. When there were bugs, they can fix them on development environment. Then they rebuild and redeploy it to testing environment with Docker. Once everything is fine, they can use Docker to deploy the same image to production environment. At the end, developers use Docker to work on the same image in different environments.

Enough talking, let's install!
We can visit official Docker web site for installing process. It will be easier if we install Docker in Windows or Mac OS. Since we are going to install Docker on Raspberry Pi, it will just add a few more steps.
First things first, we go for some preparation work:
Login our Raspberry Pi and run following command
$uname -a
It will print out the info of our system.
Linux codearasp 4.9.41-v7+ #1023 SMP Tue Aug 8 16:00:15 BST 2017 armv7l GNU/Linux
Obviously, my Raspberry Pi is called "codearasp" and it is using a 32-bit "armv7I" kernel.
Or you can use following command
$cat /etc/os-release
To see the OS of our Raspberry Pi.
PRETTY_NAME="Raspbian GNU/Linux 9 (stretch)" NAME="Raspbian GNU/Linux" VERSION_ID="9" VERSION="9 (stretch)" ID=raspbian ID_LIKE=debian
I would recommend installing Docker with at least Raspbian Jessie OS. You can also visit Docker official installation document for Raspbian here.
5 steps to install Docker on Raspberry Pi
We are just 5 more steps away to have Docker on our Raspberry Pi. Let's do it!
1 - Get the updated version for packages stored in our system
$sudo apt-get update
2 - Get necessary packages to install Docker on our system
$sudo apt-get install apt-transport-https \ ca-certificates \ software-properties-common
3 - Get the official GPG encrypted key from Docker web site
The purpose of this step is to ensure we are downloading Docker files from the official Docker source.
$curl -fsSL https://download.docker.com/linux/debian/gpg | sudo apt-key add -
4 - Setup the stable repository from Docker web site for installing Docker
$echo "deb [arch=armhf] https://download.docker.com/linux/debian \ $(lsb_release -cs) stable" | \ sudo tee /etc/apt/sources.list.d/docker.list
5 - Finally, we are going to install it!
First, we run the update command again to update packages' version, as we have just added a Docker repository.
$sudo apt-get update
Then we install Docker from the repository.
$sudo apt-get install docker-ce
Ta-Da! Docker is now installed on our Raspberry Pi device.
Hello World, Docker
The best way to verify our Docker installation, is to run a Docker command on it. So we run the following command: $sudo docker run armhf/hello-world Docker will then try to run an "hello-world" image. Unable to find image 'armhf/hello-world:latest' locally latest: Pulling from armhf/hello-world a0691bf12e4e: Pull complete Digest: sha256:9701edc932223a66e49dd6c894a11db8c2cf4eccd1414f1ec105a623bf16b426 Status: Downloaded newer image for armhf/hello-world:latest
Hello from Docker on armhf!
This message shows that your installation appears to be working correctly.
A "Hello from Docker on armhf!" message will appear if nothing goes wrong. Docker is ready on our Raspberry Pi, let's try different Docker image from Docker Hub!
Reality vs Truth
"Build once, run anywhere" is a feature of Docker. But well, it is just not the story for Raspberry Pi. Since Docker on Raspberry Pi is using armv7/6 architecture currently, it can only work with Docker images built from armv7/6. e.g. a Raspberry Pi Docker can run an image built from Raspberry Pi, but not from Mac OS. ( p.s. "Build once, run anywhere" is still valid for Docker on X86_64 machines)

Don't worry, there are many images made for armv7/6 Docker on Docker Hub. And Docker is widely used by many Raspberry Pi users around the globe. It won't be an issue for getting news or help for it.
What have we learnt in this post?
- Brief introduction of Docker
- Docker installation on Raspberry Pi
- Difference between Docker on X86_64 and armhf (armv6 / armv7) architectures