PWA - Create Easy Progressive Web App with React


Nowadays, using smart mobile is a part of our daily life. People use mobile apps to do things they want to do, messaging, shopping, reading, learning, and the list goes on. In order to enter the mobile users market, companies need to spend time and effort to create an app then publish it on Google Play or Mac App Store. While websites can be built easier and reached by more audiences. What if... What if we combine the convenience of apps and the reach of webs? So we have – Progressive Web App (PWA).
What is Progressive Web App?
As we mentioned earlier, PWA is a type of mobile app which works like ordinary apps and reaches like ordinary webs. A PWA can be installed on our mobile with an app icon, just likes other apps in our phone. It is fast and accessible in offline mode. And since it can be installed directly by entering a web url, instead of using Play / App Store to search and download. It is easier for people to add the app to their phone.
Ain't it attractive? Yes! But what do we need to build a PWA? HTML, JavaScript and CSS. Wow, it sounds easy! Yes, then what are we waiting for?
PWA Step-by-Step
We used React to build a weather forecast frontend in past. And we know how React can make the job done in an easy and component based way. So we decide to use React agto build our PWA. But before we move to step 1, there is a step 0. The reference links for PWA:
- Google's Progressive Web Apps development guide
- React's Progressive Web Apps development guide
- React's deployment guide
You can take a look on above links to find more details about PWA. Or you can go straightly with our steps to build a PWA.
Step 1: Create a React web app
Let's use create-react-app command to create our React template, pwa_funhouse!
$npx create-react-app pwa_funhouseThen we start our pwa_funhouse web app.
$cd pwa_funhouse
$yarn start
You may notice that I use yarn instead of npm to start the React app. As I find the Facebook created package manager, yarn, out performs npm in speed and stability (you can still use npm by the way).
After running the start command, it will pop out the pwa_funhouse app on your default browser.
Step 2: Check rather our app is PWA ready
If your default browser is not Chrome, let's open a Chrome browser and run our app on it. As we will use Lighthouse, the audit tool on Chrome, to check our PWA readiness.
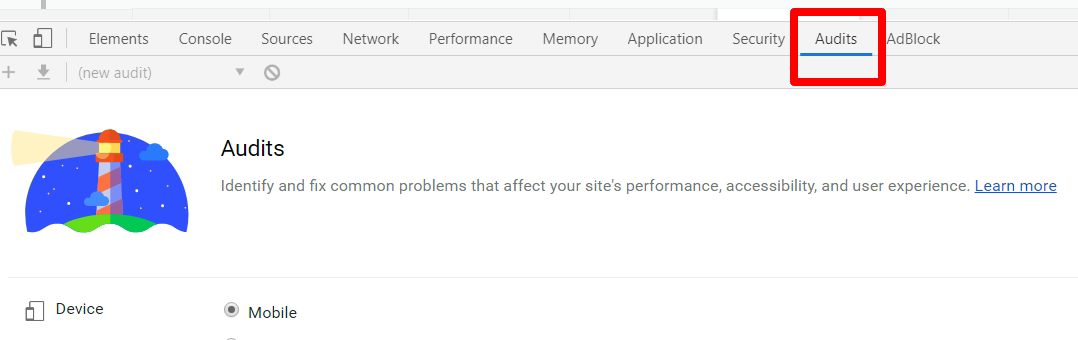
On your Chrome browser, open the "Developer tools" option, select the "Audits" tab. Then you will see the Lighthouse tool there.
Press the "Run audits" at the bottom. It starts auditing our app, then displays the results. There are different kind of results, like "Accessibility" and "SEO". But what we need to look at, is the "Progressive Web App" result. Once we click on it, it shows us many problematic issues:
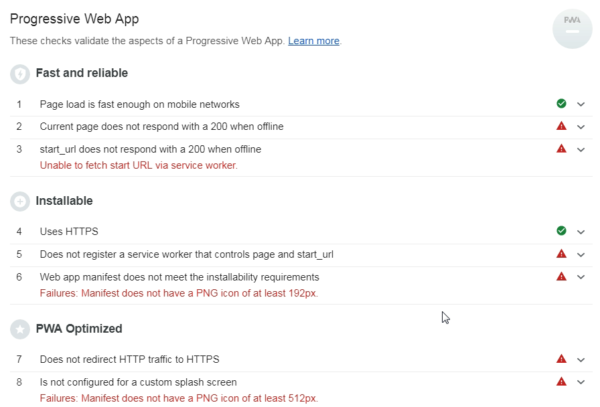
Don't worry, we are going to clear them on next step.
Step 3: Clear the PWA issues
There are several issues found by Lighthouse, let's clear those easy ones first.
- Web app manifest does not meet the installability requirements
- Failures: Manifest does not have a PNG icon of at least 192px
- Is not configured for a custom splash screen
- Failures: Manifest does not have a PNG icon of at least 512px.
From the above messages, we know there are missing icons for our app. You can download icon images from my source here and put them in "public/images/icons" folder. Then update the icons part from the "public/manifest.json" file to:
  "icons": [{
    "src": "./images/icons/icon-128x128.png",
      "sizes": "128x128",
      "type": "image/png"
    }, {
      "src": "./images/icons/icon-144x144.png",
      "sizes": "144x144",
      "type": "image/png"
    }, {
      "src": "./images/icons/icon-152x152.png",
      "sizes": "152x152",
      "type": "image/png"
    }, {
      "src": "./images/icons/icon-192x192.png",
      "sizes": "192x192",
      "type": "image/png"
    }, {
      "src": "./images/icons/icon-256x256.png",
      "sizes": "256x256",
      "type": "image/png"
    }, {
      "src": "./images/icons/icon-512x512.png",
      "sizes": "512x512",
      "type": "image/png"
    }],
Re-run the Lighthouse audits again. Yes, those icons related issues are gone. Now we go to handle other issues:
- Current page does not respond with a 200 when offline
- start_url does not respond with a 200 when offline
- Unable to fetch start URL via service worker
- Does not register a service worker that controls page and start_url
Let' sum up above issues: we don't use a service worker to handle app in offline mode. Then we have another question.
What is a service worker?
A service worker is a script that runs in background. It handles page caching, background sync and push notification in PWA. Well, doesn't it sound complicated? Maybe, but the good thing is, in React, the service worker part is already prepared for us. We edit the "src/index.js" file, then change the line of serviceWorker.unregister(); to
serviceWorker.register();Since service worker works in a production environment not development environment, we run following command to make a production build:
$yarn buildOnce the build is ready, we can start a server to run the build. If you have installed serve, you can ignore the first command.
$yarn global add serve
$serve -s build
Open the Chrome browser and we run the Lighthouse audits again.
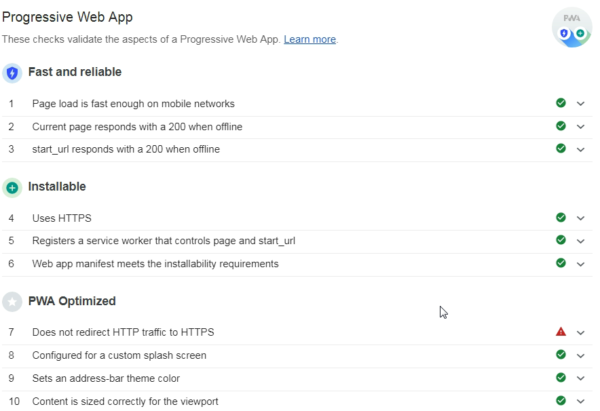
Poof! The service worker is on an we finish all major issues here!
Step 4: Check PWA network status
Since our app is now a PWA, it caches the current page when the network is down. Then it brings out an issue for us. How do we know our app is online, when both online and offline pages are the same? React-detect-offline package to rescue! Firstly, let's install the react-detect-offline using yarn.
$yarn add react-detect-offlineIt is a package that allows users to add <Online> and<Offline> tags in React. So the app can run certain behaviors when it is online or offline. In our "src/App.js" file, let import the package:
import { Offline, Online } from "react-detect-offline";
And add following code insider <header className="App-header"> :
You are onlineoffline
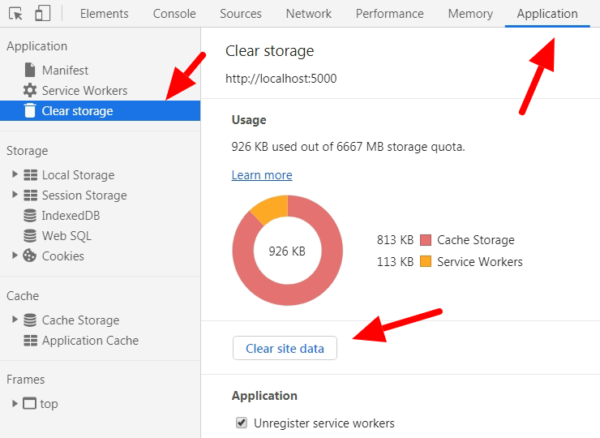
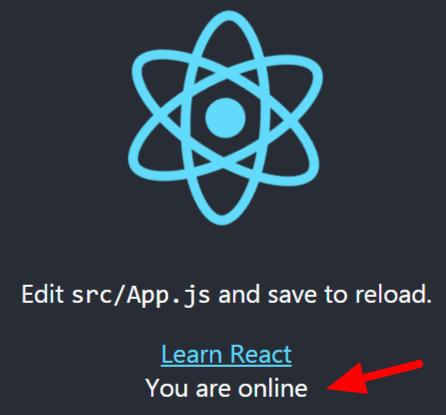
Now we build the app again and open it on Chrome browser. You may see there is nothing changed at all. Don't panic, it is a caching behavior of the service worker. I would suggest reading "The Service Worker Lifecycle" article for more details. At this moment, let's clear up the cache ourselves, by using "Developer tools" > "Application" > "Clear storage", then press the "Clear site data" button.
After that, when we refresh the app, the message of "You are online" is now showed.
For the offline message, of cause we can cut the network to make it display. But we have an easier way to test it. Let's use the "Developer tools" > "Application" once again. This time, we click "Service Workers" on the left then "Offline" on the right.
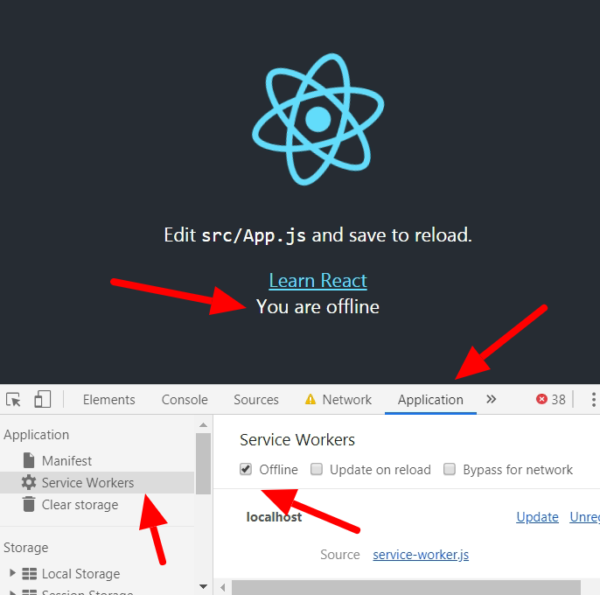
The app then shows "You are offline" message. We can untick the "Offline" checkbox to make it online again.
Step 5: Build a BTC tracker
We make a PWA with online/offline indicator, but then... now what? A PWA with React logo spinning around is so meaningless. In CodeAStar here, we always make easy and useful things :]] . Bitcoin is going up again (as of July 2019), let's build a easy BTC price tracker then.
The packages we need:
$yarn add axios
$yarn add moment
We have used the "axios" package in our weather forecast React project before. This time, we use this package to get the BTC price info from Blockchain.com. And we use "moment" package to handle the Javascript date object. We create 1 folder "Btc" and 2 files, "Btc.css" and "Btc.js", under "src" folder.
/src
  /Btc
    |- Btc.css
    |- Btc.js
Once again, you can go to my github page to download the source of those files. Inside the "Btc.js" file, we use setInterval() method to get BTC info every 1 second.
componentDidMount () { this.timerID = setInterval( () => this.getBtcInfo(), 1000 ); } getBtcInfo() { axios.get("https://blockchain.info/ticker") .then(response => { let current_price = response.data.USD.last; this.setState({ latest_price: current_price }); this.setState({ btcusd: current_price }); if (this.last_price) { let change = parseFloat(current_price) - parseFloat(this.last_price); if (change !== 0) { this.setState({ price_change: change.toFixed(2) }); let sign = (change > 0) ? '+' : ''; this.setState({ price_sign: sign }); } } this.last_price = current_price; let curr_date = moment().local().format('YYYY-MM-DD HH:mm:ss'); this.setState({ last_updated: curr_date }); }) .catch(error => { console.log(error) this.setState({ btcusd: this.state.btcusd }); }) }
Then on the "src/App.js", we import Btc component to our app.
import Btc from './Btc/Btc'
And render the Btc component.
Real Time BTC tracker from blockchain.info You are onlineoffline
After changing the css and logo of our app (copy and paste from the source), we can re-build and re-run it.
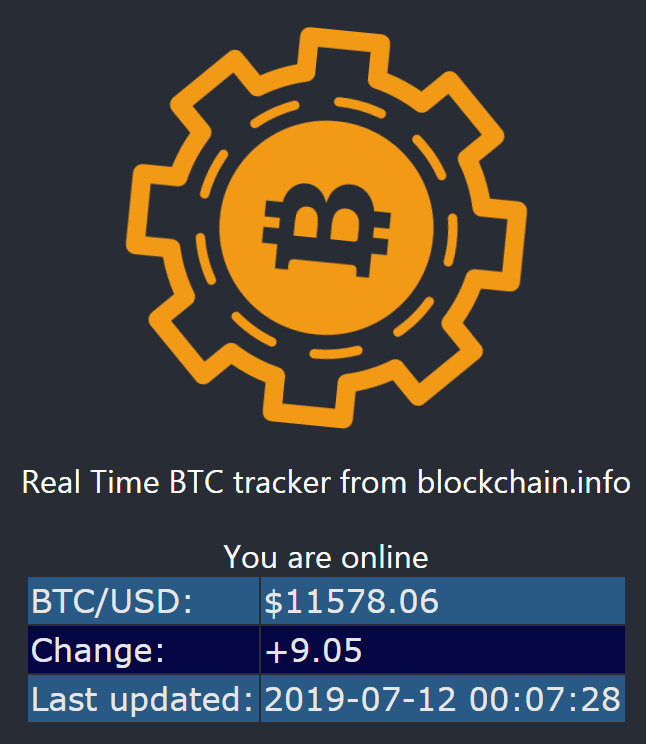
And now we have a working BTC tracker PWA.
Step 6: Put it on web server for FREE
Things look good so far. Isn't it? :]] But what we have done is all on our development environment. The next thing we do is putting all our work on a web server, so we can make a complete PWA.
First things first, we use GitHub Pages as our web server. Of course you can deploy on your own web server as well. But the GitHub one is free and HTTPS supported. And it can share the source easier.
We go to our source "src/package.json" then add "predeploy", "deploy" and "homepage" into it. You can copy following lines for "predeploy" and "deploy" under "scripts". But for "homepage", it would use "https://user_name.github.io/repository_name" naming. For my case, it is "https://codeastar.github.io/pwa_funhouse".
{
  "name": "pwa_funhouse",
  ......
  "scripts": {
    "predeploy": "yarn build",
    "deploy": "gh-pages -b master -d build",
  .......
  },
  "homepage": "https://codeastar.github.io/pwa_funhouse"
}
You may notice we have added "gh-pages -b master -d build" on "deploy". That means we use "gh-pages" package, to make a production build, then upload it to the master branch.
But before we go to next step, let's install "gh-pages" package.
$yarn add gh-pagesAnd don't forget to create a repository on github.com. After the creation, run following commands on your development environment.
$git init
$git add *
$git commit -m "first commit"
$git remote add origin https://github.com/user_name/repository_name.git
$git push -u origin master
So we can upload our source to GitHub. When the upload process is finished, we can run the GitHub Pages integration by using:
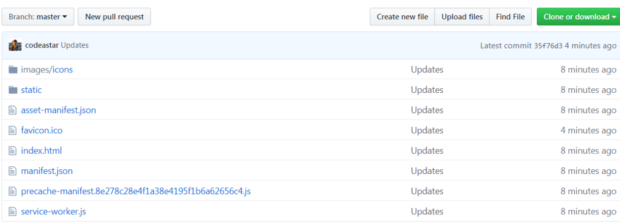
$yarn run deployNow our master branch is updated with build content instead of original source.
We are almost there, we just need to enable GitHub Pages from project setting. Select "master branch" from "GitHub Pages" > "Source".
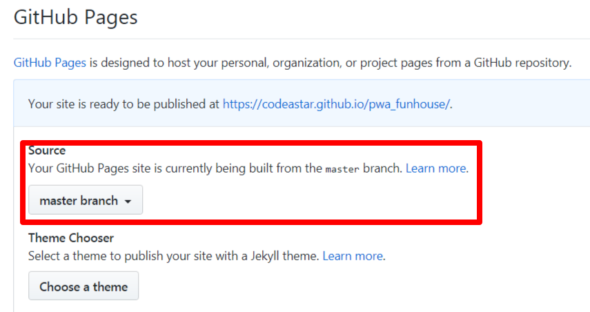
Now we are ready to run our PWA, let's click the GitHub Pages link ( https://codeastar.github.io/pwa_funhouse/ for my case ) and run the Lighthouse audits again.
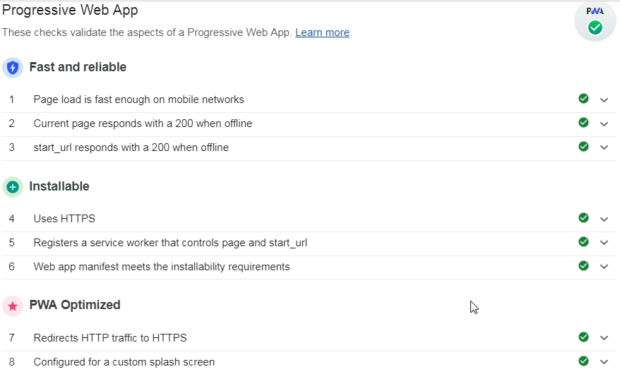
Finally, we pass all the PWA checks!
PWA Mobile Experience
The purpose of this project is to make an easy app that run like a mobile app. So let's use a mobile to access the link of our app. Then we see the screen as same as the desktop one on our phone.
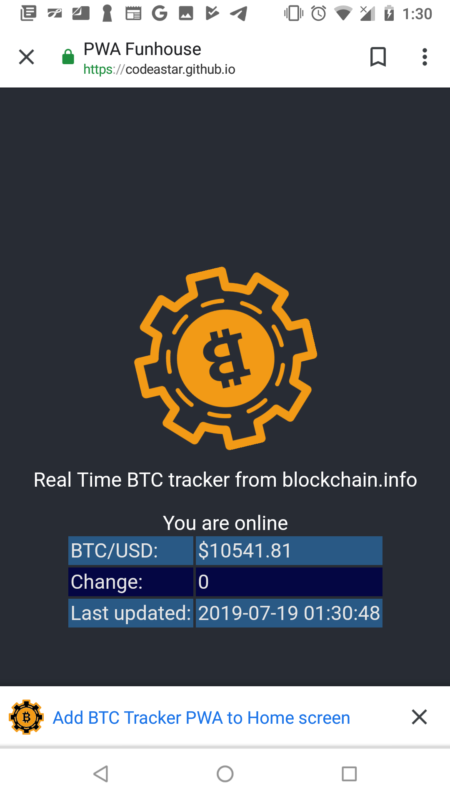
Please note that there is a dialogue of "Add BTC Tracker PWA to Home screen" at the bottom. Once we clicked it, it would pop up another dialogue.
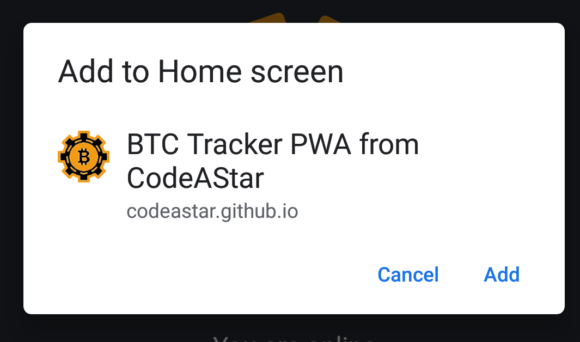
When we click the "Add" button to confirm "Add to Home screen" action, it will install the PWA on our mobile. It just likes we install an app from Google Play or App Store.
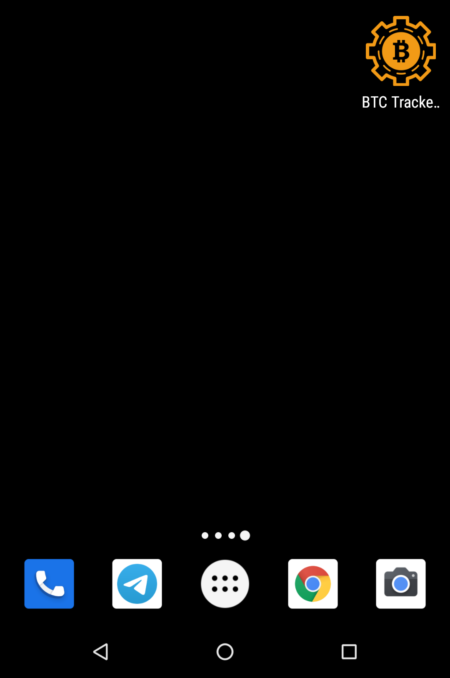
Now we have an app icon on our phone, it is fast and it can be run in online/offline mode!
What have we learnt in this post?
- Concept of PWA
- Build a PWA with React
- Usage of Lighthouse audits
- Deploy a React project into GitHub Pages
(the complete source can be found at GitHub: https://github.com/codeastar/pwa_funhouse/tree/source )