NMT - make an easy Neural Machine Translator

I haven't updated this blog for a few months. As there is something big happened in my hometown. But life must go on, so we come back here and learn a new topic --- NMT (Neural Machine Translation). You may try the translate service before (if not, let's Google Translate), it is the time we find out how natural language processing work in translation.
What is NMT?
Let we start from the very beginning, what is NMT? It is a machine translation process handling in a neural network. We have used neural network to solve different kinds of problems in this blog. For example, hand writing recognition and toxic comment classification. And this time, we use neural network in machine learning, to solve translation problem.
When we started our machine learning journey in the early posts, we mentioned machine learning was a series of actions on data analysis. In our case of translation, machine learns word relationships from reading bilingual corpora. It is no problem to translate words in this way. But it is not the full side of machine translation. We want a machine can translate not only words but a whole sentence like a human does. Then we apply neural network on machine translation.
From our previous comment classification exercise, we use neural network to let machine learn several words in a sentence. So the machine can classify rather a sentence is "toxic" or not. This time, instead of classifying a "toxic" sentence, we classify words on the sentence from language A to language B. How do we do that? Here it comes, Encoder-Decoder Model.
Encoder-Decoder Model
Although it sounds like a new term to us, in fact, we have tasted part of it before. Do you remember the word embedding in NLP? Yes, it was a encoder actually. Last time, we encoded comments into sequences. Then this time, we encode language phases into sequences. The decoder works like an encoder in reserve. But we decode sequences into another language. So the whole concept should look like:
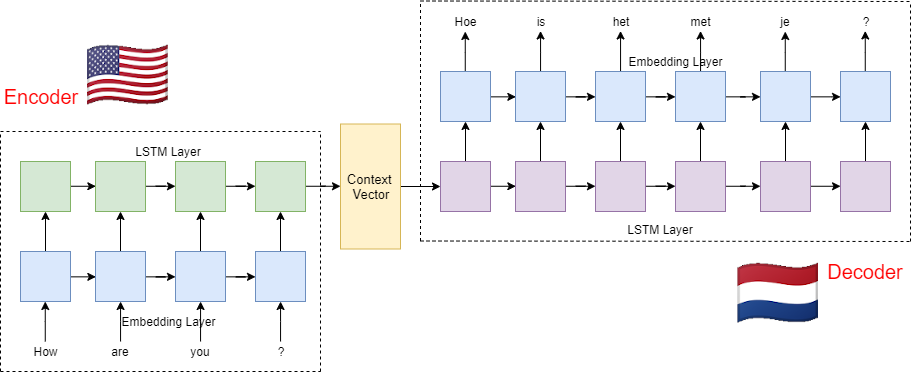
- First, we embed sentences from language A into ids, to make "machine learn-able" sentences :]]. Then we put each id from sentences into LSTM layer, i.e. several LSTM units. Each LSTM unit process its result and push forward to the next unit.
- There is a context vector to encapsulate the sentence information from the encoder into a vector.
- Like the encoder, a decoder has its LSTM layer as well. The decoder uses the final state of the encoder as its input. Then each LSTM unit produces an output and passes it to the next unit. At the end, the final layer produces a target word from language B.
Code a NMT model
In this blog, we always learn by practice. There are many ways to code a NMT model. You can run Anaconda from your machine, run on a machine learning instance from Amazon or follow my favorite way, run from a Kaggle's notebook. By using Kaggle, there are many pre-installed packages and most importantly, we can use free 30 GPU hours per week.
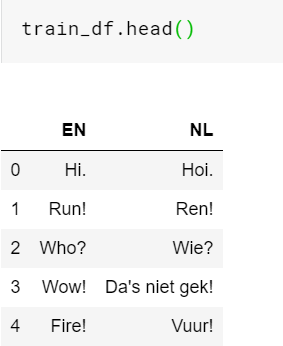
So we start our coding from a Kaggle's notebook. As this is a project created by ourselves, other than a Kaggle provided project. We need to import our own dataset. For a NMT project, the dataset we need is a set of bilingual sentence pairs. We selected a language pair from ManyThings.org then placed it on Kaggle's public dataset. Dutch was selected as I spent a good time there for my last visit :]] .
Then we add the dataset into our notebook and load it into a dataframe.
def read_text(filename): file = open(filename, mode='rt', encoding='utf-8') text = file.read() file.close() return text #load our English-Dutch sentence pairs file file_path = "/kaggle/input/en-dutch-pairs/nld.txt" #and put its content into a dataframe train_df = pd.read_csv(file_path, sep='\t', lineterminator='\n', names=["EN","NL"])
Let' see the first few rows of our dataframe.
Now we have the sentence pairs, what's next? We change human readable languages to machine readable language. Like the way we did in the toxic comment project, we use tokenizer to do the job.
Unsupervised Tokenizer
Our tokenizer chops sentences into word pieces and assigns an id to each piece. So a machine can use word ids to do NLP. Then it raises out a question, how does a tokenizer "chop" a sentence? For English sentences, we may assume it "chops" by space. But what about Asian languages like Chinese("你好嗎?") and Japanese("私は日本語を話します")? There is no space within those words. Are we going to use different tokenizers for different languages. Well, you can. But we find a better way to handle it.
We can use unsupervised tokenizer. That means we don't apply rules and languages for tokenizer, we let tokenizer learn by itself. And the tokenizer we use is SentencePiece from Google. Other than its unsupervised nature and language independence, another great we feature of SentencePiece is subword algorithm.
What can we do with "subword algorithm"? Subword is in between word and character. For example, "subword" itself is a word combined with 2 subwords, "sub" and "word". We then use subwords from our vocabulary to help handling rare and unseen words. In an extreme case, English words are combined with 26 subwords. :]]
SentencePiece in Action
We know the basic concept of SentencePiece, let' see how it goes in our English-Dutch translation project.
import sentencepiece as sp def write_trainer_file(col, filename): texts = list(col.values) with open(filename, 'w',encoding='utf-8') as f: for text in texts: f.write(text + "\n") #use sentences from train_df as our training data en_sp_trainer = "en_spm.txt" nl_sp_trainer = "nl_spm.txt" write_trainer_file(train_df["EN"], en_sp_trainer) write_trainer_file(train_df["NL"], nl_sp_trainer) #create our English SentencePiece model sp_en_train_param = f"--input={en_sp_trainer} --model_prefix=en_sp --vocab_size=7000" sp.SentencePieceTrainer.Train(sp_en_train_param) en_sp = sp.SentencePieceProcessor() en_sp.Load("en_sp.model") #create our Dutch SentencePiece model sp_nl_train_param = f"--input={nl_sp_trainer} --model_prefix=nl_sp --vocab_size=9500" sp.SentencePieceTrainer.Train(sp_nl_train_param) nl_sp = sp.SentencePieceProcessor() nl_sp.Load("nl_sp.model")
First, we load language sentences from our "train_df" dataframe into "en_spm.txt" and "nl_spm.txt" text files. Then we use those files with SentencePiece to train English and Dutch tokenizer models. Please note that we have assigned vocabulary sizes to each language. And the number is related to the size of the language sentences we have. i.e. When we have more sentences, there should be more words, so we should have larger vocabulary size.
Once we have trained our tokenizer models, we can use them to encode and decode sentences.
print(en_sp.EncodeAsPieces("This is a test.")) print(en_sp.EncodeAsIds("This is a test.")) print(en_sp.DecodeIds(en_sp.EncodeAsIds("This is a test.")))
['▁Thi', 's', '▁is', '▁a', '▁test', '.']
[69, 9, 13, 11, 1263, 3]
This is a test.
We find that "This" is divided into 2 subwords, "Thi" and "s". As "s" is widely used in plural nouns and "thi" can be found from many words like "think", "thing" and "third". The rules of tokenization are depended on the sizes of training data and the vocabulary setting.
Make the machine read the languages
Now we can tokenize sentences and encode words into ids, it is the time to let our machine read the languages.
def encode_sentence(df, lang, spm): lang_pieces = [] lang_lens = [] for index, row in df.iterrows(): lang_piece = spm.EncodeAsIds(row[lang]) lang_pieces.append(lang_piece) lang_lens.append(len(lang_piece)) df[f"{lang}_pieces"] = lang_pieces df[f"{lang}_len"] = lang_lens encode_sentence(train_df, "EN", en_sp) encode_sentence(train_df, "NL", nl_sp)
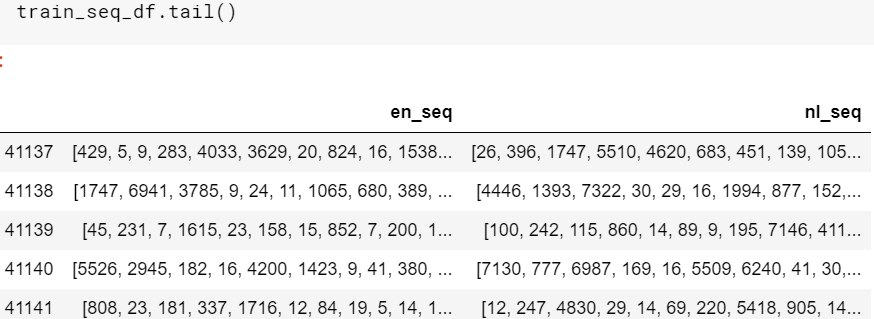
We use our SentencePiece models created earlier to encode English and Dutch sentences. Then we see what we get here:
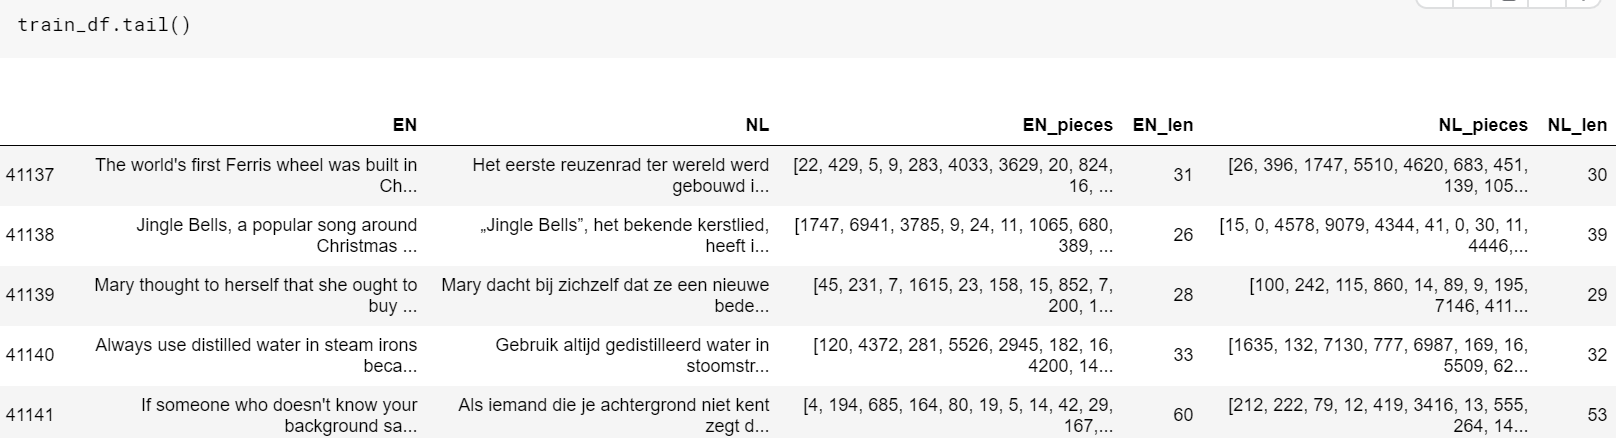
Words are tokenized and encoded into ids. Next, let' see the lengths distribution of English and Dutch sentences.
def plotLangLen(lang1, lang2): trace1 = go.Histogram( x=train_df[f"{lang1}_len"].values, opacity=0.75, name = f"Length of {lang1} sentences", marker=dict(color='rgba(171, 50, 96, 0.6)')) trace2 = go.Histogram( x=train_df[f"{lang2}_len"].values, opacity=0.75, name = f"Length of {lang2} sentences", marker=dict(color='rgba(12, 50, 196, 0.6)')) data = [trace1, trace2] layout = go.Layout(barmode='overlay', title=f"Lengths of {lang1} and {lang2} sentences", xaxis=dict(title='Length'), yaxis=dict( title='Count'), ) fig = go.Figure(data=data, layout=layout) iplot(fig, config={'showLink': True}) plotLangLen("EN", "NL")
Well, most of English and Dutch sentences are under length of 30 pieces. So we use 30 as the max length for sentence padding, thus we can save our machine's processing time.
from keras.preprocessing.sequence import pad_sequences en_vocab_size = en_sp.get_piece_size() nl_vocab_size = nl_sp.get_piece_size() en_max_length = train_df["EN_len"].max() nl_max_length = train_df["NL_len"].max() #we use 30 as length here, to shorten processing time en_max_length=30 nl_max_length=en_max_length #use post padding to fill up short sentence with 0 en_padded_seq = pad_sequences(train_df["EN_pieces"].tolist(), maxlen=en_max_length, padding='post') nl_padded_seq = pad_sequences(train_df["NL_pieces"].tolist(), maxlen=nl_max_length, padding='post') train_seq_df = pd.DataFrame( {'en_seq':en_padded_seq.tolist(), 'nl_seq':nl_padded_seq.tolist()})
And now we have made a English-Dutch dataframe which is only readable by machine.
The NMT Model Building Time!
Although the heading here sounds attractive, in fact, we just do a basic NMT model in a few lines of code. :]]
def define_model(input_vocab,output_vocab, input_length,output_length,output_dim): model = Sequential() #mark_zero , set 0 as special character reserved for unknown words model.add(Embedding(input_vocab, output_dim, input_length=input_length, mask_zero=True)) model.add(LSTM(output_dim)) #repeat the input (n) times model.add(RepeatVector(output_length)) #return the full sequences model.add(LSTM(output_dim, return_sequences=True)) model.add(Dense(output_vocab, activation='softmax')) return model
We then put the language sequences into our model and start to train it. Have a cup of your favorite drink or spend some time for other CodeAStar articles. :]] We are going to witness the birth of our first ever NMT model.
train, test = train_test_split(train_seq_df, test_size=0.1, random_state = 3) trainX = np.asarray(train["nl_seq"].tolist()) trainY = np.asarray(train["en_seq"].tolist()) testX = np.asarray(test["nl_seq"].tolist()) testY = np.asarray(test["en_seq"].tolist()) #sparse_categorical_crossentropy for densed target output as integers model.compile(optimizer=optimizers.RMSprop(lr=0.001), loss='sparse_categorical_crossentropy') filename = 'nmt_model' checkpoint = ModelCheckpoint(filename, monitor='val_loss', verbose=1, save_best_only=True, mode='min') # train model history = model.fit(trainX, trainY.reshape(trainY.shape[0], trainY.shape[1], 1), epochs=15, batch_size=64, validation_split = 0.1,callbacks=[checkpoint], verbose=1)
When we train our model, we record the loss and validation loss of each epoch.
It seems that our model won't be improved after the 8th epoch. Since we have saved the 8th epoch model using ModelCheckpoint, we can load the model there and predict our outcome. We then use Dutch sentences as input and predict the English translations.
model = load_model('nmt_model') preds = model.predict_classes(testX.reshape((testX.shape[0],testX.shape[1]))) def get_word(ids, tokenizer): return tokenizer.DecodeIds(list(filter(lambda a: a != 0, ids.tolist()))) test_ids = [] test_nls = [] test_ens = [] test_mts = [] for y_index in range(len(testY)): test_ids.append(y_index) test_nls.append(get_word(testX[y_index], nl_sp)) test_ens.append(get_word(testY[y_index], en_sp)) test_mts.append(get_word(preds[y_index], en_sp)) predict_df = pd.DataFrame( {'id':test_ids, 'NL':test_nls, 'EN':test_ens, 'MT':test_mts})
We pick 10 Dutch sentences (NL) from the testing set randomly, then compare the actual English translation (EN) with our machine's translation (MT).
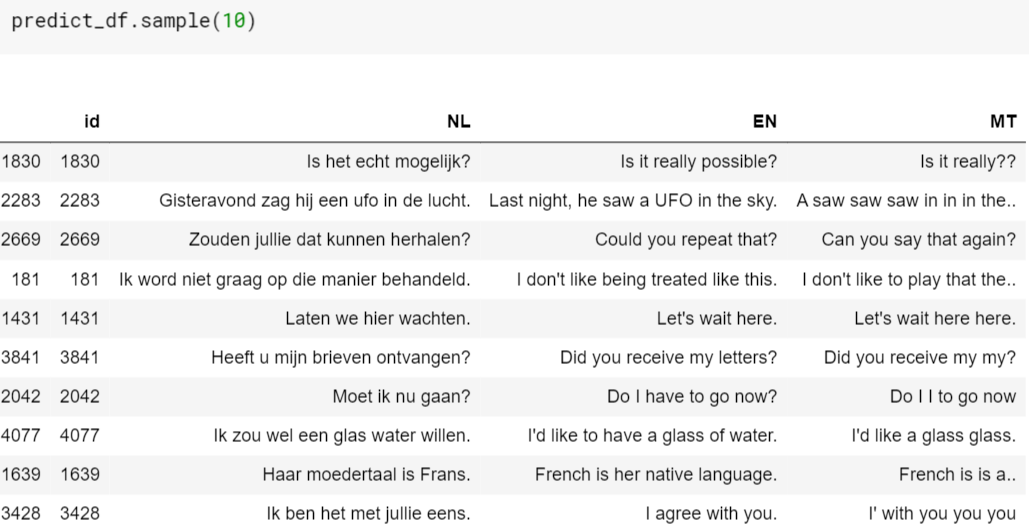
Oh well, there's room for improvement. But at least we have made our first ever NMT model.
Suggestions
From above results, we notice that certain words cannot be translated. We may need to increase the number of sentence pairs for model training. Other than the training dataset, we need to use larger training files for both Dutch and English SentencePiece models as well, thus they can recognize more words.
On the NMT model itself, we may need to add more layers to tune up the model performance. We have just started our journey of NMT here, there are still a lot of places to be adventured!
What have we learnt in this post?
- Concept of NMT
- Concept of Encode-Decoder Model
- Usage of unsupervised tokenizer
- Building a working NMT model
(the complete source can be found at Kaggle: https://www.kaggle.com/codeastar/nmt-playground )