React Frontend and Flask Backend for Weather Forecast – Part 2


From our last post, "Flask Backend and React Frontend for Weather Forecast – Part 1", we built our magic user, RESTful API as the backend module with Flask. This time, we are going to build our sword swinger, who always deals with challenges at the front line. Before we go further, let's have a little rewind. Do you remember why we separate web app into backend and frontend modules? Yes, I know you can answer it (don't you? :]] ). Because of utilizing both modules to their max capability. From our 2019 Top Programming Languages post, we mentioned that frontend languages are much stronger nowadays and hot in job market. Although we have focused on Python backend mostly in this blog, it is a valuable experience to taste the frontend languages. So, let's enter our new page of frontend languages, and code our React Frontend for the EZ Weather Forecast (EZW) project.
Why React Frontend?
Yes, why React? Since there are several frontend languages, like Angular and Vue.js. Our reasons of choosing React are: ease of use, popularity and the size of community. Actually, those are also the reasons we pick Python as our major language as well. It will be easier if we try something new which is similar to something we are familiar with.
Oh wait, you don't have any React experience? No problem, then we go for it step-by-step. First things first, even though we always use the term "frontend languages", they are all JavaScript framework or library. In order to write our frontend (JavaScript) module, we need a JavaScript runtime --- Node.js. Go to download the latest stable version and run following command to start our first ever React frontend:
$npx create-react-app ezw_react
$cd ezw_react
$npm start- "npx" command is a package runner tool from Node.js, hence, it is running the "create-react-app" package.
- "create-react-app" the name says it all, it creates a React boilerplate under the folder "ezw_react"
- "npm start" starts our React boilerplate app!
Thus we have started our first ever React frontend module on http://localhost:3000. We have prepared our development environment, so it is time to update the generic boilerplate to our actual EZW frontend.
EZW Frontend with React
Before we start our coding, let's define our expected outcome. On our previous EZW single module setup, we have following user interface:
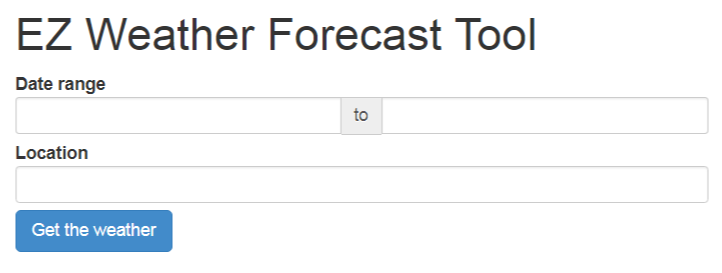
So our requirements are: a pair of date pickers , a location input box and a submit button for our frontend.
Okay, let's go back to our "ezw_react" folder and start our coding. First, remove all files within "ezw_react/src" folder. Yes, remove them all. Don't panic, we just remove unwanted files and replace files that matter later. Then, we go to install required packages for "ezw_react" using npm. Npm is a package manager tool, so you can think about it as Node.js version of Python's pipenv. We install following packages:
- react-datepicker (date picker package)
- react-geosuggest (package to handle geolocation)
- axios (promise based HTTP client)
- moment (JavaScript date object handler)
- react-icons-weather (package to display weather icons)
with the command, npm install <package_name> --save.
After that, we create a index.js file under "src" folder with following content:
import React from 'react'; import ReactDOM from 'react-dom'; import DatePicker from "react-datepicker"; import "react-datepicker/dist/react-datepicker.css"; class Ezw extends React.Component { constructor(props) { super(props); this.state = { startDate: new Date(), endDate: new Date(), }; this.handleChangeStart = this.handleChangeStart.bind(this); this.handleChangeEnd = this.handleChangeEnd.bind(this); } handleChangeStart(date) { }//handleChangeStart handleChangeEnd(date) { }//handleChangeEnd render() { return (
EZ Weather Forecast React Frontend Date range: TO ); }//render }//ezw ReactDOM.render( , document.getElementById('root') );
Open http://localhost:3000 in the browser, you should see our date pickers created using React.
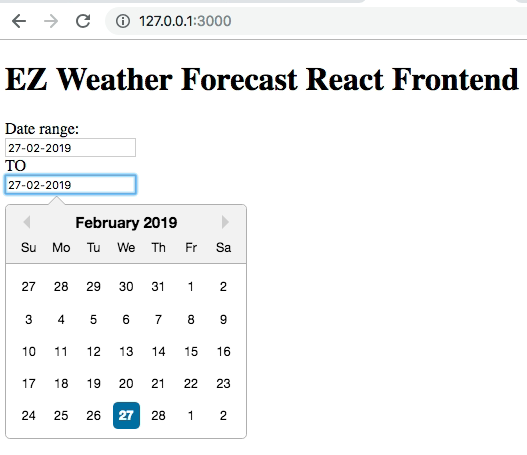
Ta-Da! We just made our first React app by ourselves! There are major code blocks in our source, index.js:
- create a React component, "Ezw"
- initialize startDate and endDate as component states
- create two empty date methods for later use
- bind date methods to the React component "Ezw"
- add Datepicker objects in HTML-like syntax on render method
- Render the React component "Ezw" into a HTML reference "root"
We have all the basic setup for our date pickers. The next thing we need to do is adding logic to our Ezw React component. Do you remember the states and date methods we created in previous step? Now we are going to use them to get date information into the Ezw component. So we update the Ezw component with:
handleChangeStart(date) { if (date > this.state.endDate) { this.setState({ endDate: date }); } this.setState({ startDate: date }); }//handleChangeStart handleChangeEnd(date) { if (date < this.state.startDate) { this.setState({ startDate: date }); } this.setState({ endDate: date }); }//handleChangeEnd
Handle Geolocation with Google API
From our single module EZW Flask solution, we handled geolocation in backend. And we mentioned in past, the modern day frontend languages are more powerful, they can handle some of the backend tasks as well. So why don't we take the advantage of frontend module and provide user a better user experience? Thus we have the React GeoSuggest package.
The idea of GeoSuggest is easy, we let user enter a part of a location and we provide a list of suggestion from Google map. Since it is a Google service, we have to use Google web service API key. Let's move to Google Developer Console for key generation. After that, we enable Google Maps Geocoding API, Google Places API Web Service and Google Maps Javascript API to make the React GeoSuggest package work.
Now we have the API key and the enabled services. Other than we hard code the key into our source, there is a better way to handle variables in React --- by using a .env file. The .env file should be located under the root folder at:
/ezw_react
    /src
      index.js
      index.css
    /public
      index.html
    package.json
    .env
We put REACT_APP_GOOGLE_API_KEY=<your Google API key> in the .env file. And then we put <script src="https://maps.googleapis.com/maps/api/js?key=%REACT_APP_GOOGLE_API_KEY%&libraries=places"></script> into the <head></head> section of /ezw_react/public/index.html.
React GeoSuggest in Action
Okay, we have finished the Google API setting, now it is the time we bring the GeoSuggest to live. First, we add new states and methods in constructor:
import Geosuggest from 'react-geosuggest'; constructor(props) { super(props); this.state = { .... latitude: null, longitude: null, readyToSubmit: false, location: null, status: "Enter date and location..." }; .... this.handleLocation = this.handleLocation.bind(this); this.resetLocation = this.resetLocation.bind(this); }
Second, we define new location methods, which obtain location information from Google:
handleLocation(loc) { if (typeof loc !== 'undefined') { this.setState({ latitude: loc.location.lat, longitude: loc.location.lng, location: loc.label, readyToSubmit: true, status: "Ready to Send" }); } }//handleLocation resetLocation() { this.setState({ latitude: null, longitude: null, readyToSubmit: false, status: "Enter date and location..." }); }//resetLocation
Finally, we put the GeoSuggest object in Render() method:
render() { var fixtures = [ {label: 'Mountain View Station, Mountain View, CA, USA', location: {lat: 37.3945565, lng: -122.0782263}}, {label: 'Mountain View Public Library, Franklin St, Mountain View, CA, USA', location: {lat: 37.3968885, lng: -122.0929291}}, ]; return ( ..... Location: this._geoSuggest=el} placeholder="Start typing!" initialValue="Mountain View" fixtures={fixtures} onSuggestSelect={this.handleLocation} onChange={this.resetLocation} location={new window.google.maps.LatLng(37.38605, -122.08385)} radius="20" /> ); }//render
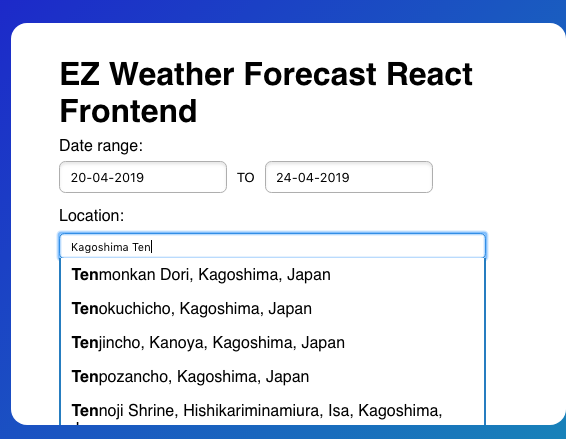
Please note that we have added a default location "Mountain View" and 2 fixture locations, "Mountain View Station" and "Mountain Public Library". Those settings are optional, as we just want to try more of the GeoSuggest package. We also apply CSS setting to make the EZW app look fancy, and you can get the complete source at the end of this topic. Then we have:
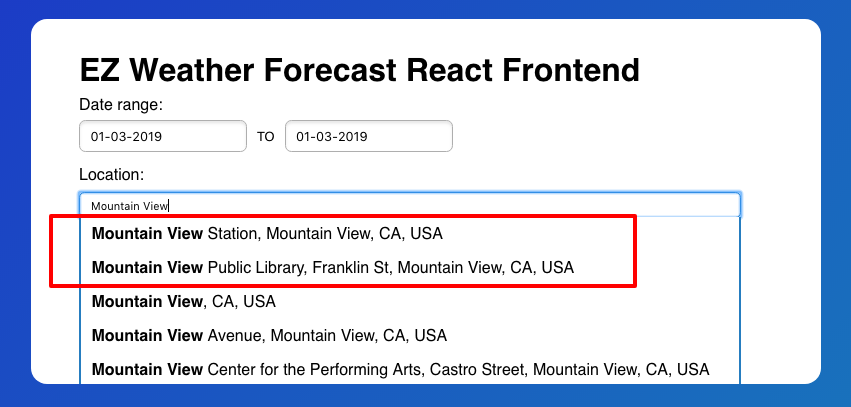
The first two suggestions in red rectangle are the ones we entered in above code. While others are place suggestions returned from Google Places API! Let's review our current process. A pair of date packers? Check! Geo suggestion? Check! Now we only need a submit button and a layout of our weather report.
Get Weather Report from Backend
We are almost there. In order to get weather reports, we need to send our request with JSON to our EZW Flask backend module. Like the way we setup Google API key, we can set the EZW backend url at .env file. Assuming the EZW Flask backend is set at http://127.0.0.1:5000/ezw_api, so we put following line in the .env file:
REACT_APP_EZW_API=http://127.0.0.1:5000/ezw_apiUpdate index.js by adding following functions:
import WeatherIcon from 'react-icons-weather'; function cardLayout(props, i) { return ( Date: {props.date} Max Temperature: {props.max_temperature} Min Temperature: {props.min_temperature} Summary: {props.summary} Chance of rain: {props.raining_chance} ); }//cardLayout function Weathercard(props, location) { let weather_reports = props.reports; let reports_length = 0; let json_reports = []; if (typeof weather_reports !== 'undefined') { json_reports=JSON.parse(weather_reports); reports_length = json_reports.length; }//if not undefined var rows = []; for (var i = 0; i < reports_length; i++) { rows.push( cardLayout(json_reports[i], i)); } return ( {location} {rows} ); }
Those functions define our weather report layout, using the JSON response from EZW backend. Please note that we use a React package, react-icons-weather, to display weather icons from Dark Sky API.
Now we add the part that sends out a JSON request to our EZW backend:
import axios from 'axios'; import moment from 'moment'; class Ezw extends React.Component { constructor(props) { .... this.getDateResult = this.getDateResult.bind(this); } getDateResult() { this.setState({ status: "Processing...", }); //send to server let json_req = {"latitude": this.state.latitude, "longitude": this.state.longitude, "start_date": moment(this.state.startDate).format('YYYY-MM-DD'), "end_date":moment(this.state.endDate).format('YYYY-MM-DD')}; axios.post(process.env.REACT_APP_EZW_API,json_req) .then(res => { this.setState({ status: Weathercard(res.data) }); }) //axios }//getDateResult
You may notice that we are using 2 JavaScript packages on above code: axios and moment. Axios is our HTTP client for handling HTTP request/response. The major benefits of using axios are: 1) it is promise based and 2) it is JSON ready. And for the moment package, it is a popular JavaScript package for handling and formatting date object.
The getDateResult function is straight forward, it collects date and location information from our UI, then send a JSON request and receive a JSON response to/from our EZW Flask backend. Our EZW backend url is defined by the environment variable, process.env.REACT_APP_EZW_API. And yes, it is the REACT_APP_EZW_API variable we set on the .env file earlier.
We have all the functions ready, then it is the time we render the submit button and weather report:
render() { .... let weather_report; weather_report = this.state.status; return ( .... SUBMIT {weather_report} ); }//render }//ezw
Let's enter date range and location for our test run.
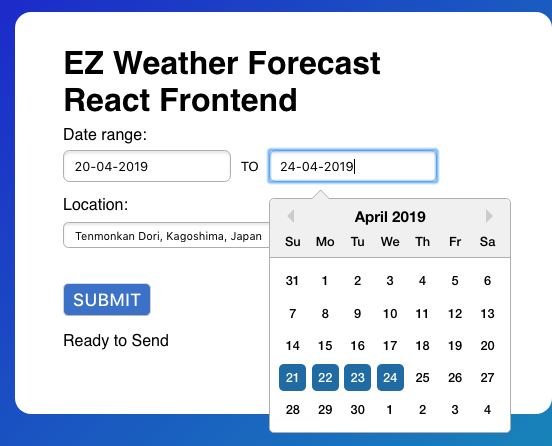
Here we go:
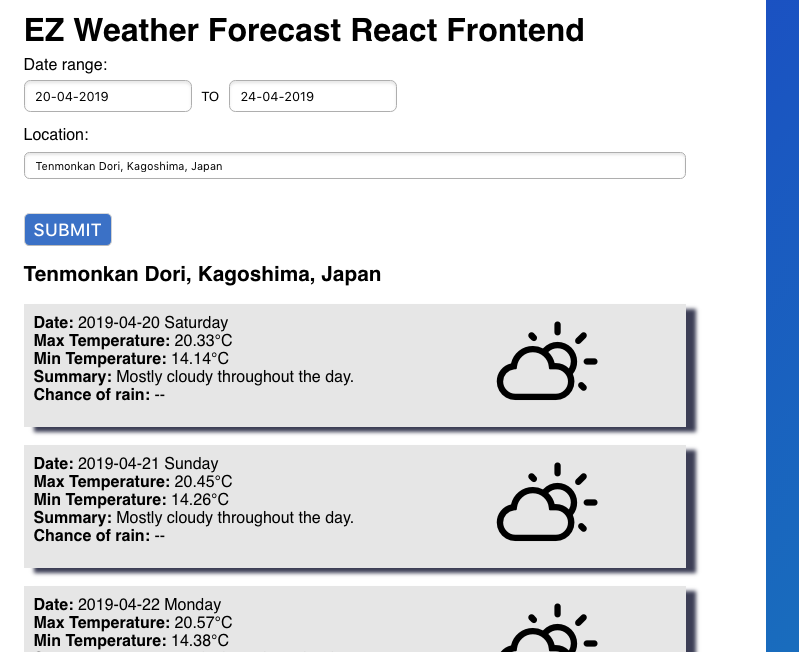
Ding! We have our fully functional EZW app using React frontend and Flask backend! Let's have another EZW demo:
Conclusion
The benefit of using React is its component based architecture. Our date picker, weather report and geo suggest are all components. And each component has its own methods and APIs. Therefore they can handle their requests on their own, like getting geo suggestions from Google, and without the need of a page refresh. Further more, components can be reused and rearranged, which can shorten app development time and give frontend developers a lot of room to make changes.
We have both Backend and Frontend modules ready, what's next? Let's bring the EZW app live using Amazon Web Services (AWS) on our final chapter!
What have we learnt in this post?
- Usage of React to build frontend component
- Usage and setting of Google API
- Sending and receiving JSON object to/from backend module
- Component based architecture of React
(the complete source can be found at GitHub: https://github.com/codeastar/ez_weather_forecast_react_frontend )