Easy Cheap Flights Seeker Web App with Flask and React


We have 1, 2, 3, 4, 5 months without updating the CodeAStar web site. It seems 2020 is not a good year for everybody. What we can do are, stay strong, stay positive and keep learning. So let's continue on what we mentioned last time --- Easy Cheap Flights Seeker Web App. Did I mention "Easy" last time? No, actually. But once you have followed our steps to build the Cheap Flights Seeker Web App, you will probably agree with us.
Components of Easy Cheap Flights Seeker Web App
Before we start to build our Easy Cheap Flights Seeker Web App, let we have a big picture of the Web App and its related components.
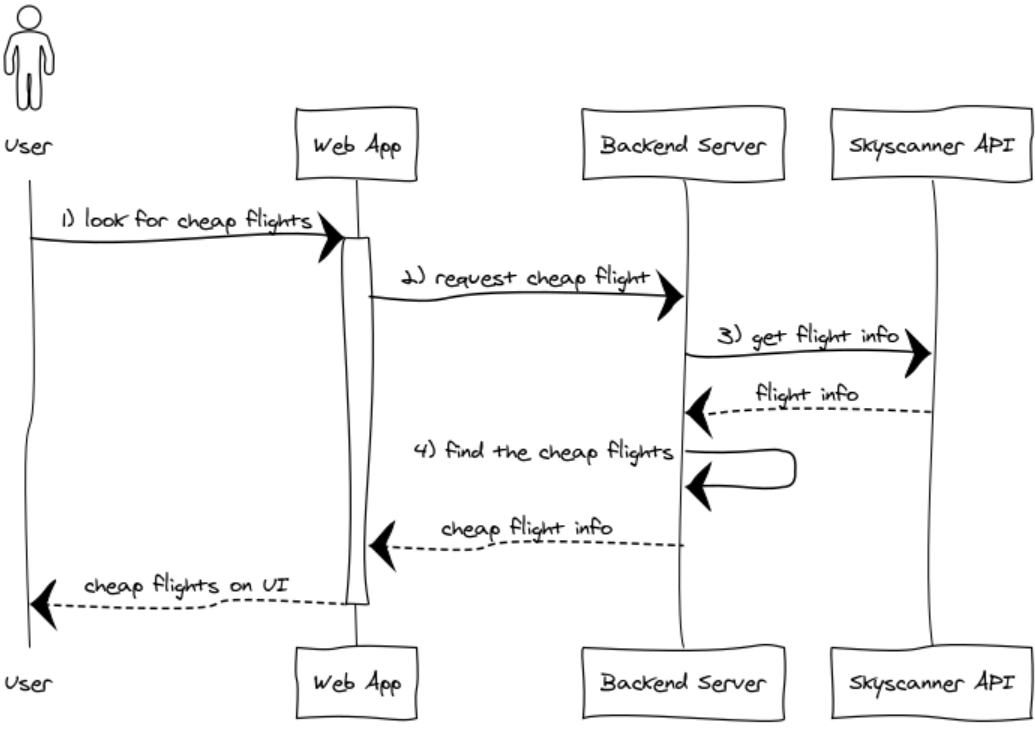
So we have:
- User --- the one who uses the web application (yes, you and me and others!)
- Web App --- the platform that the user interacts with
- Backend Server --- the engine handling requests from the Web App
- Skyscanner API --- the gateway for getting flight information
Easy Cheap Flights Backend
The first component we build is the backend server that finds cheap flights. The good news is, we don't need to start everything from scratch. Do you remember our past exercise, the command line based, Cheap Flights Checker? Yes, that Python program can do our flight searching logic. It acts as a proxy for us to interact with the Skyscanner API. Then we need to add the airport seeker logic from our previous post into the Python program. Everything seems fine? Not yet. It is still a Python standalone program, what we need is a backend server. No problem, it is an easy task for us. We can build a Flask backend server, just likes the way we did for building a weather forecast server in the past.
In our backend server source, other than the major flight info API and the newly added airport API, we would like to add two more Skyscanner API requests as well. They are countries and currencies APIs. So we can provide market (country) and currency options for user to select. And our code should look like:
db = TinyDB('skyscanner.json')
Countries = db.table('Countries')
Currencies = db.table('Currencies')

def getCountries(headers):
    country_list = []
    request_start_time = time.time()
    url = ENDPOINT_PREFIX+f"reference/v1.0/countries/en-US"
    response = requests.request("GET", url, headers=headers)
    if response.status_code != 200: handleAPIException(response.text, "getCountries")
    ss_countries = json.loads(response.text)
    Countries.insert_multiple(ss_countries["Countries"])
    ss_countries = ss_countries["Countries"]
    for country in ss_countries:
        country_list.append(country['Name'])
    return country_list, request_start_time

def getCurrencies(headers):
  url = ENDPOINT_PREFIX+f"reference/v1.0/currencies"
  response = requests.request("GET", url, headers=headers)
  if response.status_code != 200: handleAPIException(response.text, "getCurrencies")
  currencies_json = json.loads(response.text)
  for element in currencies_json["Currencies"]:
    currency = {}
    currency["Code"] = element["Code"]
    currency["Symbol"] = element["Symbol"]
    Currencies.upsert(currency, Query().Code == currency["Code"])
(you can find the complete source link from the bottom of this post)
To start the backend server, first of all, let insert your Rapid's Skyscanner API key into your server environment. It should be:
>export SKYSCAN_RAPID_API_KEY=YOUR_KEY   (for Linux/MacOS)
or
>$Env:SKYSCAN_RAPID_API_KEY="YOUR_KEY"   (for Windows PowerShell)
or
>set SKYSCAN_RAPID_API_KEY=YOUR_KEY      (for Windwos command shell)
Once the API is set, we can start our backend server (in development environment). Please note that for the initial startup, it may need several minutes to load up all country/airport/currency information from Skyscanner side. All the information will be stored in our TinyDB json file, thus reducing data loading time for future server startup.
> python .\main.py
Get country information from Skyscanner API...
Got country information
Get airport information from Skyscanner API...
100%|██████████████████████████████████████████████████████████| 234/234 [06:29<00:00,  1.66s/it]
Got airport information
Get currency information from Skyscanner API...
Got currency information
Easy Cheap Flights Frontend
Our backend server is lock-and-load'ed. It is time for building our web application frontend. Similar to the time we build our weather forecast frontend, we use React as our library for building user interfaces. But this time, we use Material-UI to fasten and standardize our frontend development. In a nutshell, we use Material-UI to make our task easy.
First things first, let's create our React project.
$npx create-react-app ez_cheap_flights_webNow it is the time to bring Material-UI to our project.
$npm install @material-ui/coreOur base is ready, what's next? Do you remember the web app mock up we mentioned in previous post? Yes, this one.
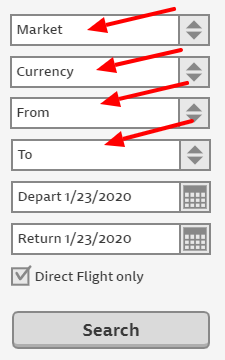
So we are going to have some search boxes for selecting currency, market and location. It would be better if those boxes can do auto-complete. Then we will need date packer for selecting the flight date, a checkbox for selecting direct flight and then a button to submit the request. All of the components should be placed under a grid. thus we can easily arrange the location of each componet. Okay, we think we have the blueprint in our mind, let's do the coding.
Coding with Material-UI
From our react template folder, we start adding our Flask backend URL for our frontend to interact with. Find the .env or .env.development file under the template folder, then add:
REACT_APP_EZ_SKYSCANNER_API=http://localhost:5000/"Localhost:5000" is our Flask backend address, you may change it to your designated ip or port.
We start our coding from App.js file. You will see App.js itself is a React component. And the React library is all about using components to build an application. So we add our wanted components from the above web app mockup to App.js. Firstly, let's build a blank App component.
import React from 'react';
import Container from '@material-ui/core';
import './App.css';

class App extends React.Component {

  constructor(props){
    super(props);
    const apiUrl = process.env.REACT_APP_EZ_SKYSCANNER_API;
  };

 render() {
    return (
      <container maxwidth="md">
      </container>
    );
  }//render
}//class

export default App;
It is a simple blank container with nothing inside, yet. As we need to add several components to build our Flights Seeker Web App, let' start with those easy ones --- Button and Checkbox.
import {Box, Grid, Container, Typography, Checkbox, FormControlLabel} from '@material-ui/core';
  constructor(props){
    super(props);
    this.state = {
       find_status: '',
       flight_info: null,
       disable_flag: false,
       direct_flight_flag: true,
    }
    this.handleClick = this.handleClick.bind(this);
  };

  handleClick=() => {};
  render() {
    return (
      <Container maxWidth="md">
        <Grid container spacing={2}>
          <Grid item xs={12}>
            <Box bgcolor="info.main" color="info.contrastText" p={1}>
              <Typography variant="h4" component="h1">
                EZ Cheap Flights Seeker
              </Typography>
            </Box>
          </Grid>
          <Grid item lg={6}>
            <FormControlLabel
             control={
             <Checkbox checked={this.state.direct_flight_flag} onChange={this.handleDirectFlight} name="checkedB" color="primary"  />
               }
               label="Direct flight only" disabled={this.state.disable_flag}
             />
          </Grid>
          <Grid item xs={12}>
             <Button variant="contained" fullWidth={true} color="primary" onClick={this.handleClick} disabled={this.isFindNotReady()}>Find Flights!</Button>
          </Grid>
        </Grid>
      </Container>
    );
  }//render
Besides the presentation components, Button and Checkbox, we also added "state" and "method" to our program to handle our logic.
Auto Complete in Material-UI
When we want to make a more complex component with its own specified operations, we write the component to a separate file then import it back to our main program (App.js in our case). As we have mentioned before, we would like to make an Auto Complete search box components. It would be applied to Currency, Market and Location. Since Location is the most complicated one among the other two, let's get started, with Location.
We create a component folder with a Location component file as "LocationInputField.js". So we have following file structure now:
/ez_cheap_flights_web
    /src
      /components
         LocationInputField.js
      App.js
      App.css
    /public
      index.html
    package.json
    .env
On "LocationInputField.js", as it is a search box, we then import TextField component from Material-UI into it. And we have mentioned the Auto Complete function, so we import Autocomplete component as well. Please note that the Autocomplete component is not fully released as of the current date (October, 2020). But it still suits well for what we asked for. Let's get the package from Material-UI:
$npm install @material-ui/labOn our code, we then import core and lab components from Material-UI:
import Box from '@material-ui/core/Box';
import TextField from '@material-ui/core/TextField';
import Autocomplete from '@material-ui/lab/Autocomplete';
import Alert from '@material-ui/lab/Alert';
import Snackbar from '@material-ui/core/Snackbar';

var place_list=[];
class LocationInputField extends React.Component {
....
}
In order to reduce the number of API calls, we should search the client's browser records for related records first. In our "LocationInputField" case, we search the client's browser local storage for the airport list and selected airport. If there are no such records, we go to call our API and store the records back to the client's browser.
      componentDidMount() {
        var cachedSelectedPlace;
        if (this.props.type === locationFrom)
        {
            cachedSelectedPlace = localStorage.getItem("selected_from");
            this.setState({ form_text: "From" });
            this.setState({ form_id: "From" });
        }
        else if (this.props.type === locationTo)
        {
             cachedSelectedPlace = localStorage.getItem("selected_to");
             this.setState({ form_text: "To" });
             this.setState({ form_id: "To" });
        }//if type

        var cachedPlaces = localStorage.getItem("places");
        if (cachedPlaces) {
          place_list = JSON.parse(cachedPlaces);
          this.setState({ places: place_list})
          this.setState({ error_status: false })
        } else {
            fetch(this.props.url+"/api/places")
            .then(res => res.json())
            .then((data) => {
              data.sort((a, b) => a.PlaceName.localeCompare(b.PlaceName));
              localStorage.setItem('places', JSON.stringify(data));
            })
            .catch((error)=>{
                console.log("Got error")
                console.log(error);
                this.setState({ error_status: true,  })
            })
        }//if cachedMarket

        if (cachedSelectedPlace)
        {
          let selectedPlace= place_list.find(place => place.Iata === cachedSelectedPlace);
          if (selectedPlace)
          {
            this.setState({ selected_place: selectedPlace })
            this.props.onClickLocation(selectedPlace.Iata);
          }
        }//if (cachedSelectedCurrency)
      }//componentDidMount
When a user selects an airport, we store it as onClickLocation, a property of our LocationInputField component. From the above codes, we only do record retrieving and sorting tasks. The auto complete action is purely handled by Material-UI's Autocomplete component itself. The things we need to do are providing a location list for Autocomplete component to complete (what we have just done) and render the Autocomplete component.
    render() {
        return (
           <box>
            <autocomplete id="{this.state.form_id}" options="{this.state.places}" getoptionlabel="{option" => option.PlaceName+", "+option.CountryName + " ("+option.Iata+")"}
              value={this.state.selected_place}
              onChange={this.handleChange}
              disabled={this.props.disable_flag}
              renderInput={params => (
                <textfield {...params} label="{this.state.form_text}" variant="outlined" fullwidth>
              )}
            />
            <snackbar open="{this.state.error_status}" autohideduration="{6000}" anchororigin="{{vertical:'top'," horizontal:'right'}}>
              <alert severity="error" onclose="{()" => {this.setState({ error_status: false,  })}}>Network error found on Location API</alert>
            </snackbar>
           </textfield></autocomplete></box>
           );
    }//render
Submit the Flight Search
After selecting a location, it will trigger an onChange event. We then put the selected location into a property of our LocationInputField component. Thus our main page, App.js, which imports LocationInputField component can take the location value and interact with other components.
      handleChange=(event, value) => {
        if (value != null)
        {
          let selectedPlace = this.state.places.find(place => place.Iata === value.Iata);

          if (selectedPlace)
          {
            this.setState({ selected_place: selectedPlace })
            this.props.onClickLocation(value.Iata);
          }
        }//if value != null
      }//handleOnChange
We do similar handling on CurrencyInputField and MarketInputField components. Then on our App.js file, we set the location value into our page state. Among with values from other components, we gather them, save them to local storage, create a backdrop layer to avoid user making changes on UI, and send a API request to our backend server.
 handleLocationFrom = (fromLocation) => {
    this.setState({ selected_location_from: fromLocation});
  }//handleLocationFrom

 handleClick=() => {
    localStorage.setItem('selected_market', this.state.selected_market);
    localStorage.setItem('selected_currency', this.state.selected_currency);
    localStorage.setItem('selected_from', this.state.selected_location_from);
    localStorage.setItem('selected_to', this.state.selected_location_to);
    //show backdrop
    this.setState({ backdrop_flag: true});
    this.setState({disable_flag: true});
    this.setState({find_status: "Searching flight info..."});
    this.setState({flight_info: null});

    let query_data = {
      market:this.state.selected_market,
      currency: this.state.selected_currency,
      date_depart:this.state.selected_departing,
      date_return:this.state.selected_returning,
      place_from:this.state.selected_location_from,
      place_to:this.state.selected_location_to,
      directFlag:this.state.direct_flight_flag,
      day_range: this.state.day_range,
    };
    axios.post(this.state.url+"api/findflight", query_data)
      .then(res => {
        let json_res = res.data;
        let flight_info_group = json_res.flight_info_group;
        let message = "";
        if (flight_info_group === null)
        {
          message = ConstantClass.CONSTANT_ERROR_TAG;
        }
        else
        {
          let flight_info_array = flight_info_group.map(flight_info => { return flight_info; })
          this.setState({ flight_info: flight_info_array});
        }//if === error
        this.handleClose(message);
      })
  };  // handleClick
After that, we receive a JSON response from backend server containing cheap flight information or system message. We don't handle the output on App.js directly. We pass it to FlightInfoGrid component.
Flight Info Grid
The idea of using a component to display our flight info is, making it as an independent presentation solution. Let's rewind for what we wanted the flight info output from the past.
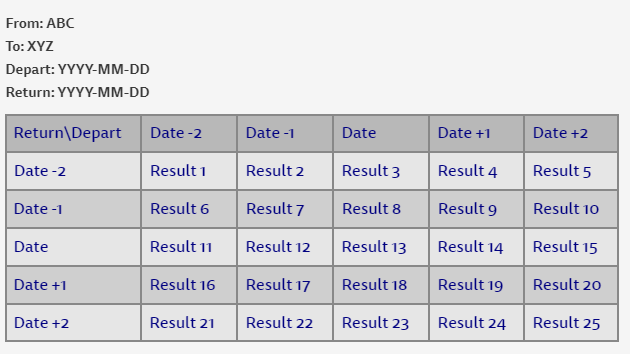
Yes, a grid. We use the Grid component to present our data. If we would like to make another presentation, let' say, a list. We can just pass the JSON response to another component.
So we make the FlightInfoGrid.js file and use GridListTile component from Material-UI to display the flight information loop.
    render()
    {
        return(
        <grid classname="gridinfo">
          <gridlist cols="{(this.state.date_returns).length+1}" cellheight="auto" classname="grid-list">
            <gridlisttile key="p1" cols="{1}" classname="gridcell">
                  <paper classname="paper flight-date" square="{true}"> Depart \ Return</paper>
            </gridlisttile>
            {this.state.date_returns.map((r_date) => (
              <gridlisttile key="{"r"+r_date}" cols="{1}" classname="gridcell">
                 <paper classname="{r_date" =="=" this.state.return? "paper flight-date selected-date":"paper flight-date"} square="{true}">{r_date}</paper>
              </gridlisttile>
            ))}
            {this.state.date_departs.map((d_date) => (
              <gridlist key="{"d1"+d_date}" cols="{(this.state.date_returns).length+1}" cellheight="auto">
                <gridlisttile key="{"d"+d_date}" cols="{1}" classname="gridcell">
                  <paper classname="{d_date" =="=" this.state.depart? "paper flight-date selected-date":"paper flight-date"} square="{true}">{d_date}</paper>
                </gridlisttile>
                  {  this.state.date_returns.map((r_date) => (
                     <gridlisttile key="{d_date+"_"+r_date}" cols="{1}" classname="gridcell">
                       <this.displayflightinfo d_date="{d_date}" r_date="{r_date}" group="{this.state.flight_info_group}/">
                     </this.displayflightinfo></gridlisttile>
                )) }
              </gridlist>
                )
            )}
          </gridlist>
        </grid>
        );
    }//render
Components Assemble
We have described our major components and their code snippets here. For the complete programming sources, both frontend and backend, you can find their links at the bottom of this post. Right now, let start our frontend app and backend server. So we can see what our Easy Cheap Flights web app looks like:
What have we learned in this post?
- Reuse frontend components in React
- Use Material-UI to standardize our frontend components
- Use local storage to reduce the number of API calls
- Apply Auto Complete on Material-UI
- Use Grid list to display records in a loop
(the complete source packages can be found at GitHub: EZ Cheap Flights Flask Backend and EZ Cheap Flights React Web App)