Elastic Beanstalk with React Frontend and Flask Backend – Part 3


We have our Flask backend at the back to handle magic (weather forecast logic) and we have our React frontend dealing with user interfaces. So, what are we missing here? Every great team needs a leader to bring teammates working together. Thus we need a service to align both backend and frontend. Here she comes, the cloud service. There are three major cloud service providers nowadays, Amazon Web Services (AWS), Microsoft Azure and Google Cloud. Since we have used AWS in our projects before, and AWS is still the biggest market leader and having the vastest toolsets. So we use AWS Elastic Beanstalk (EB) to bring our EZ Weather Forecast (EZW) app to public.
Flask on AWS
From Flask official web site, the author has already stated that "Flask’s built-in server is not suitable for production". But don't worry, that is the reason why we need AWS. Since Flask is just a lightweight web framework without typical web server functions, like load balancing and access control. AWS Elastic Beanstalk (EB) is the service which helps us on handling those missing functions. By using EB, we only need to focus on Flask coding and let EB handles the rest. And most importantly, we can do it FREE. So what are we waiting for? Let's climb the beanstalk!
First things first, make sure you have an valid AWS account (go to register one if you don't have, again, it is FREE). Then go to GitHub to clone or download our Flask backend source. Please note that this version of Flask backend is slightly different then the original one in previous post (we will discuss the details later).
Setup your Flask and EB environments
Go to the directory with the downloaded Flask backend source, you may find that there is a "requirements.txt" file. As EB is using good old "pip" to install packages, instead of the way we do with "pipenv". Now, let' start our virtual environment using:
$pipenv shellThen get the AWS EB Command Line Interface (EB CLI), it is the tool we use to connect our Flask source to AWS EB.
$pip install awsebcliWe can start all the magic from here. But wait, according to AWS Best Practices, we should create an individual user for handling each different task. We did it before in our Amazon ECS Docker project. Let's do it one more time.
Create IAM user for Elastic Beanstalk
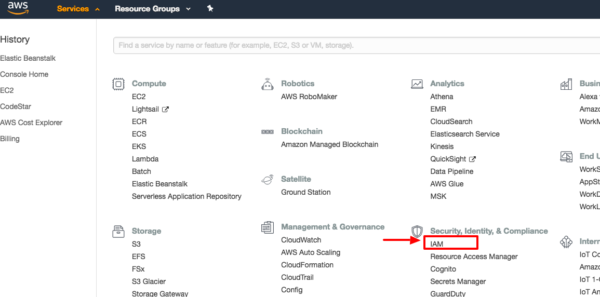
Login to AWS management console, select "IAM" from "Services" menu.
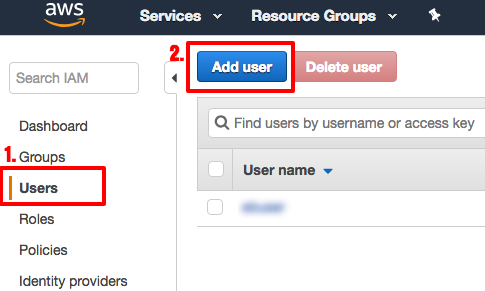
In the IAM interface, click "Users" on the left, then click "Add user".
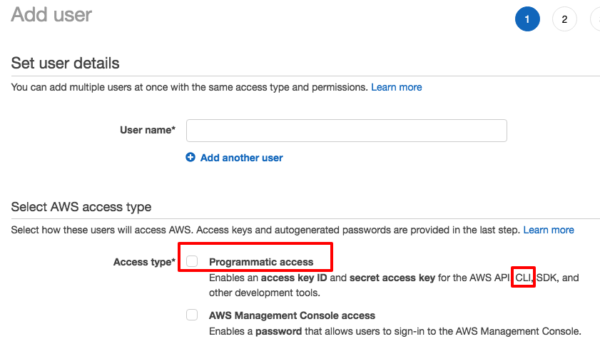
Type a user name here. Since we are using CLI on EB operation, remember to click the "Programmatic access" access type.
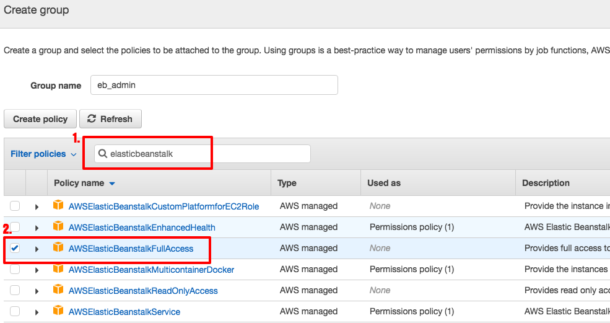
After adding the user name, let's create an Elastic Beanstalk group for this user.
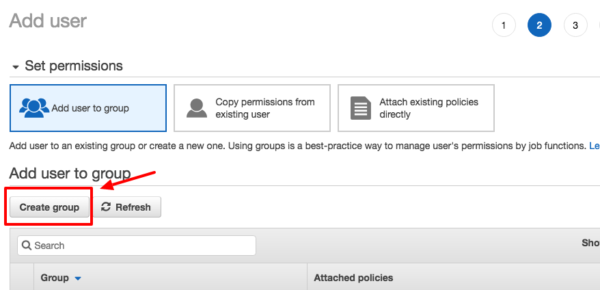
Search the group policies with keyword, "elasticbeanstalk", then click "AWSElasticBeanstalkFullAccess". It provides all EB access rights for us to do EB deployment and other configurations.
After that, press a series of clicks until we finish the user creation. Don't forget to save the AWS access id and secret key at the confirmation page, as we will use them in following steps.
Deploy Flask on Elastic Beanstalk
Let's go back to our Flask directory and start the EB deployment (Yeah! Finally!). The magic words are:
$eb initThen you will see following lines, asking which region you would like to deploy to.
Select a default region
1) us-east-1 : US East (N. Virginia)
2) us-west-1 : US West (N. California)
3) us-west-2 : US West (Oregon)
4) eu-west-1 : EU (Ireland)
5) eu-central-1 : EU (Frankfurt)
6) ap-south-1 : Asia Pacific (Mumbai)
7) ap-southeast-1 : Asia Pacific (Singapore)
8) ap-southeast-2 : Asia Pacific (Sydney)
9) ap-northeast-1 : Asia Pacific (Tokyo)
10) ap-northeast-2 : Asia Pacific (Seoul)
11) sa-east-1 : South America (Sao Paulo)
12) cn-north-1 : China (Beijing)
13) cn-northwest-1 : China (Ningxia)
14) us-east-2 : US East (Ohio)
15) ca-central-1 : Canada (Central)
16) eu-west-2 : EU (London)
17) eu-west-3 : EU (Paris)
18) eu-north-1 : EU (Stockholm)
(default is 3):
Once you have entered a region number, the program will ask your credentials. That is why we ask you to save the access id and secret key earlier. :]]
You have not yet set up your credentials or your credentials are incorrect
You must provide your credentials.
(aws-access-id):
(aws-secret-key):
Then the system will ask you the application name and your Python version:
Enter Application Name
(default is "ebs_ezw"):
Application ebs_ezw has been created.

It appears you are using Python. Is this correct?
(Y/n):

Select a platform version.
1) Python 3.6
2) Python 3.4
3) Python 3.4 (Preconfigured - Docker)
4) Python 2.7
5) Python
(default is 1):
Actually , we can use an one liner to do above things:
$eb init -p python-3.6 ebs_ezw --region us-west-2But I would suggest running it step-by-step for the first time AWS EB user. When all the settings are done, it is the time to deploy our EZW Flask app.
$eb create

Enter Environment Name
(default is ebs-ezw-dev):
Enter DNS CNAME prefix
(default is ebs-ezw-dev):
We can use all default setting and let the program deploy our app. After a successful deployment, the program will create an EB url for us with following format: http://<DNS CNAME prefix>.<region>.elasticbeanstalk.com . For above case, it is http://ebs-ezw-dev.us-west-2.elasticbeanstalk.com . That's the end? No. Do you remember there are environment variables in our EZW Flask app? Other than the DARK_SKY_KEY, we have added another variable, REF_WHITE_LIST, for this version.
REF_WHITE_LIST is a referrer white list for access control. So our EZW backend will only handle requests from our white listed domains. We can set those environment variables on EB using:
$eb setenv DARK_SKY_KEY=<your Dark Sky API key> REF_WHITE_LIST='elasticbeanstalk.com, abc.com'From the above setting, we accept incoming API requests from "elasticbeanstalk.com" and "abc.com". And now our EZW Flask backend is on AWS and open to public!
EB on AWS console
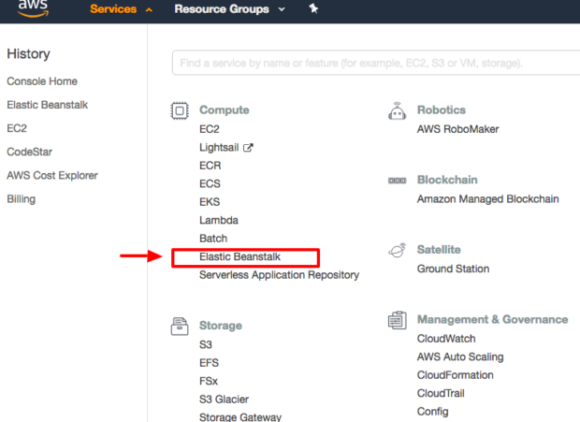
Besides using EB CLI, we can use GUI to do all the above things as well. Let's login to AWS management console, select "Elastic Beanstalk" from "Services" menu.
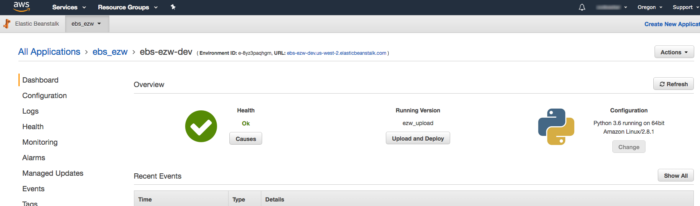
By clicking the application name, we can check the application's health and logs, and modify version and configuration.
When we can do it all from GUI, why do we do it the CLI way? As we expect there are ongoing updates on the EZW backend, then we can use script language to automate the deployment process. Otherwise, we have to login the management console and deploy the app manually.
Build the Frontend
We have deployed our Flask backend on AWS. It is time we do the same on our React frontend.
The procedure is similar to above steps, first, we go to get the React frontend source from GitHub. Then, we put all the source under a directory (e.g. /ezw_frontend), update the .env file with your Google API Key and the EZW API url. The EZW API url is the location where we deploy our EZW Flask backend, i.e. http://<your EB environment>.elasticbeanstalk.com/ezw_api . In our case, it is http://ebs-ezw-dev.us-west-2.elasticbeanstalk.com/ezw_api .
After the .env file setup, we are ready to build our React frontend. Let's run "npm install" to install required libraries and build the frontend using "npm run build".
$cd ezw_frontend
$npm install
$npm run build
Now we have our production build stored under /ezw_frontend/build directory. The next step is running the EB deployment steps again within the build directory, so we can put our React frontend on AWS as well.
That's it! We are now having our EZW app on AWS, which is open to public and most importantly, it is FREE!
Elastic Beanstalk on your own domain
It is good to have AWS hosting our modules for free. But it would be better, if we can use our own domain, "codeastar.com" in my case, instead of their "elasticbeanstalk.com". No problem, let's do it with some extra setup and just a little bit of cost.
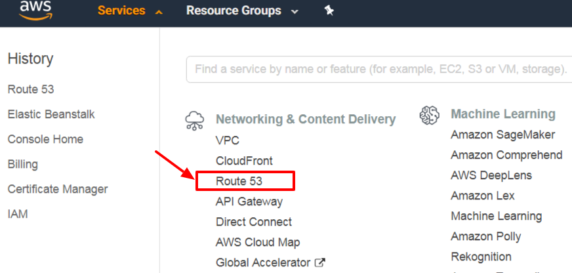
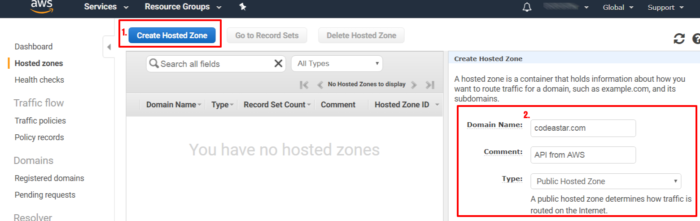
Firstly, we need to assign our domain name to the EB url, let's take a ride to "Route 53" :]] .
Click "Create Hosted Zone" from "Hosted zones" and enter domain name information.
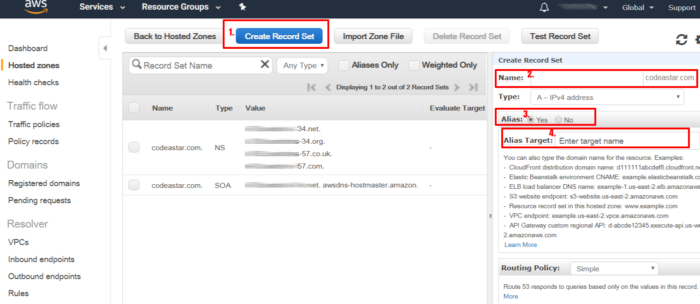
Our target is assigning the EB application to "api.codeastar.com". So we click "Create Record Set" and enter "api" as record set in box 2. Select "Yes" as "Alias" in box 3 and enter the alias target, i.e. the <your EB environment>.elasticbeanstalk.com link , in box 4.
By using custom domain name, AWS will charge us USD 0.5 per month for each hosted zone.
Create SSL from AWS
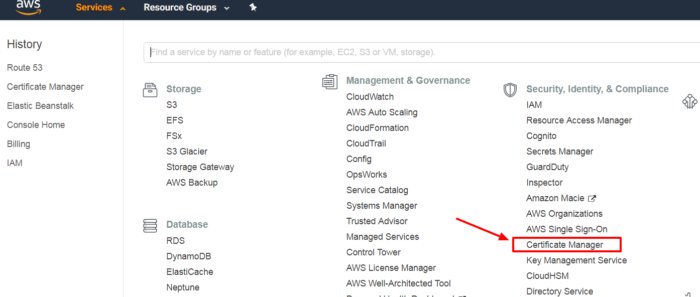
Since our codeastar.com is using HTTPS fully. It will cause mixed content error when we send or receive a request from a HTTP location. Thus we need to apply a SSL certification to our EB application. But before we doing this, we need to issue a SSL certification. And it is good that we can do all the stuff within the AWS console. :]] Let's click "Certificate Manager" from AWS menu.
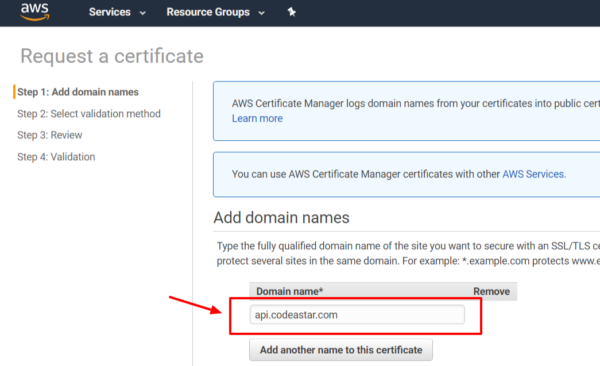
Click "Request a certificate" and enter domain information, in our case, it is "api.codeastar.com".
Then we can click through the end with default settings. Once the certificate is generated, it provides us a "Create record in Route 53" option. Just click it and it will add it to Route 53. Or you can add the record on Route 53 yourself.

HTTPS on Elastic Beanstalk
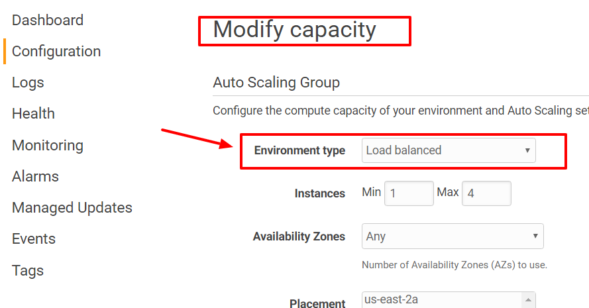
We go back to the EB console page, select our EB environment, click "Configuration" and "Modify" under "Load balancer" box.

If you did not enable "Load balancer" from previous setup, don't worry, just go to "Capacity" to set "Environment type" to "Load balanced" and press "Apply".
On the "Load balancer" interface, click "Add listener" and you will see a popup like this:
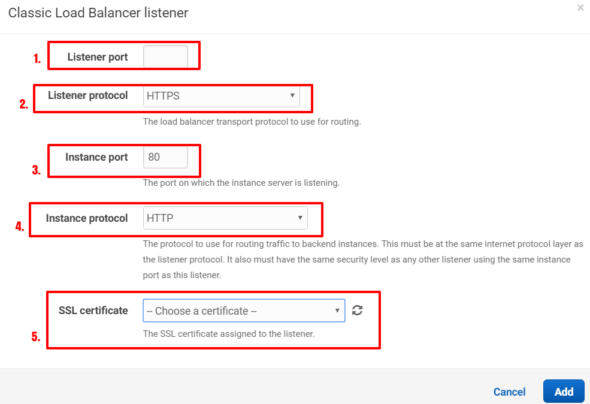
For a typical HTTPS setup, we can use following settings:
- enter 443 as listening port
- select HTTPS as listening protocol
- enter 80 as instance port
- select HTTP as instance protocol
- select the SSL certificate generated from "Certificate Manager"
We have done all the AWS configurations, the final thing we need to do is adding those Name Server records (NS) from Route 53 interface to your hosting service provider. You may see similar interface from your hosting console (I am using cloudflare):

Select "NS" as DNS record type, enter our sub-domain name, "api", and enter the name server from "Route 53". There should be several name servers from "Route 53", enter all then let the internet handles the rest!
Conclusion
Besides getting the know-how on using AWS EB, it is an exercise for us to get used to develop application or service via cloud. Cloud computing help us to focus on developing new ideas and products, and leave infrastructure to other experts. There are many successful cloud based companies like Stripe, Slack, Cloudflare, Zoom, etc. It is worth for us to spend time working on cloud based applications.
What have we learnt in this post?
- Concept of application deployment on cloud computing
- Usage of AWS Elastic Beanstalk
- Getting SSL certificate from AWS
- Using custom domain with AWS EB